Did you recently buy a Cricut machine and are now wondering how to get started? Perhaps, you're still on the fence about buying it because you're not sure how it works.
In either case, this article will break down all your doubts about how to use a Cricut Machine and provide a step-by-step guide on how to get started.
So without further ado, let's get you started with our “Cricut for dummies” beginner's guide.
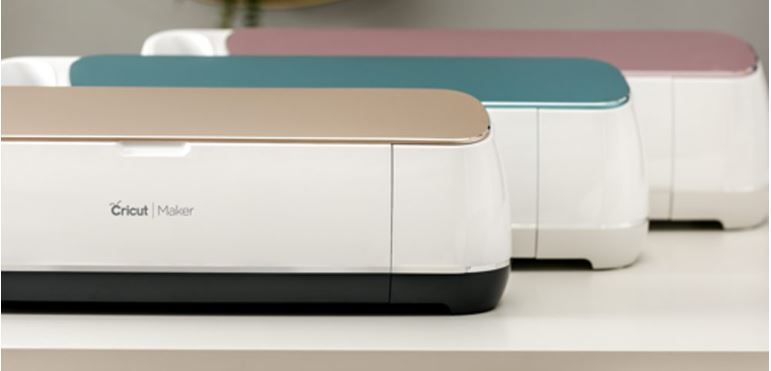
Current Cricut Machines on the Market
I'm going to make the assumption that you might still be in the researching phase of your machine and that are you just trying to wrap your head around what you can do with a Cricut Machine. We have a wonderful post on what a Cricut machine is, together with what you can do with a Cricut Machine here.
On top of that, you will also need to figure out which Cricut Machine you want to buy. As a quick summary:
- The Cricut Maker is the latest release and it is geared towards cutting fabric.
- If you wish to work with paper and vinyl, you can save yourself a few bucks by grabbing the Cricut Explore Air 2 instead.
Cricut also has a small heat press, called the Cricut EasyPress 2 on the market. But for the sake of this article, we will be focusing on their cutting machines. For more info on the Cricut EasyPress 2, click here.
Cricut Set Up Instructions
Now that you hopefully have an idea of which cutter you wish to buy, let's have a quick look at how to set it up once it arrives in your home.
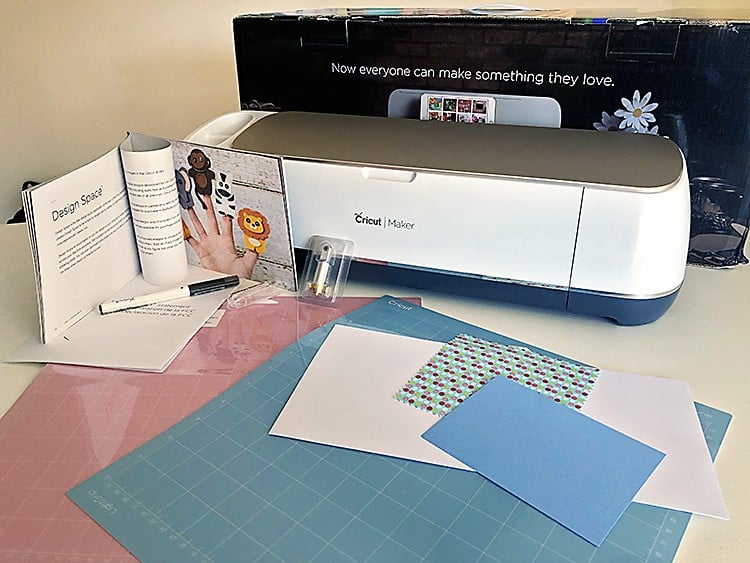
1. Unboxing The Parts & Setting Up
The principal parts/items you need to get started with your Cricut machine are:
- The Cricut Machine
- Cricut Getting Started Guide
- Preinstalled Cutting Blade
- Cricut Cutting Mat
- Pen and Preinstalled Accessory Adapter
- Samples
Carefully unpack all of your pieces. Find a ‘home' for your new Cricut cutter and plug it into a power source. Press the power button to start up your machine.
Next, set up the electronic device that you’ll be designing on. The software is compatible with a desktop computer, a laptop, tablet or even your phone. You will need to have access to the internet in order to download your software.
2. Download The Cricut Design Space Software
All your design work will be made digitally using software called Cricut Design Space.
The first thing you need to do is register for an account at Cricut. Now login to your software online and select “New Machine Setup” from the right drop-down menu.

Follow the questions and steps (they are set out very clearly in the software).
It will ask you to connect your new machine. You can do this in two ways.
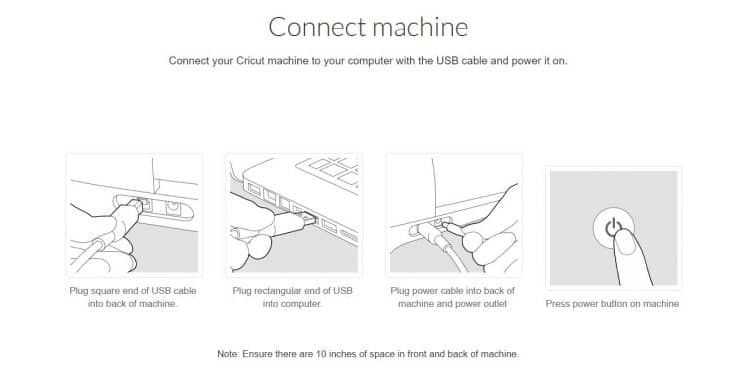
You can either connect your computer to the Cricut machine by a USB cord (included in the packaging) or via Bluetooth. The higher-end models of Cricut Machines all have Bluetooth connectivity which you can find under “Settings.” If they ask for a password, just put in 0000.
Further Reading:
- Here is Cricut's tutorial on how to connect your Cricut Explore or Cricut Maker to Bluetooth.
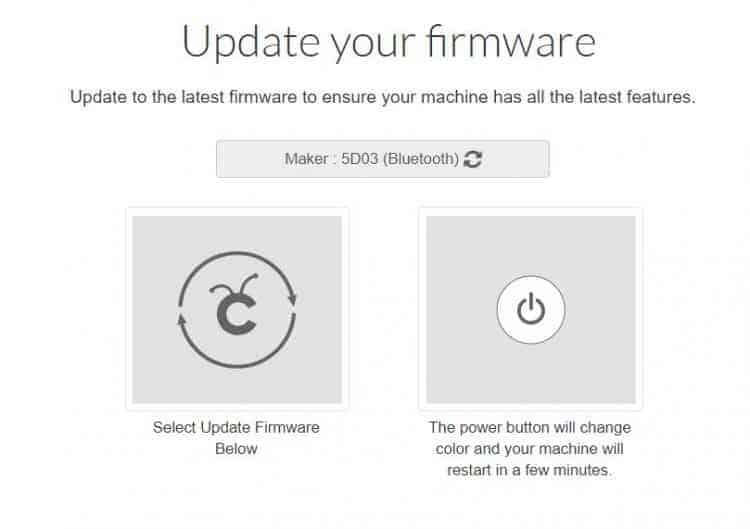
Next, they will check to see if your machine needs an update.
The software will need to download and install an app that works from your chosen device. The App is currently available fully on iOS and Android systems.
Tip: The software app is cloud backed up, so you can access your designs from any device. I often create on my laptop but then switch to my phone so I can sit closer to the cutter whilst it cuts. Fortunately I have access to the same project on both computer and phone.
If you want, you can also get a subscription to Cricut Access (this will save you loads of money in the long run – you do get a month free, so try it out first if you wish).
Tutorial: How To Use A Cricut For Beginners
Now that your machine is set up, your software app is downloaded and your cutter is switched on, let's get to the fun bit, shall we. Let's create!
The easiest way to get started is to simply pick a project that is located in your Design Space Library. The library contains video tutorials as well as hundreds of projects that come with step-by-step directions.
1. How To Make Your First Cricut Machine Design
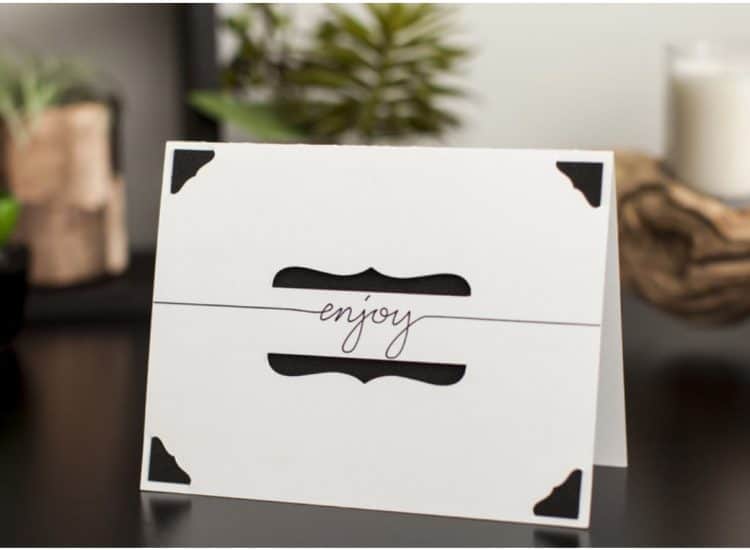
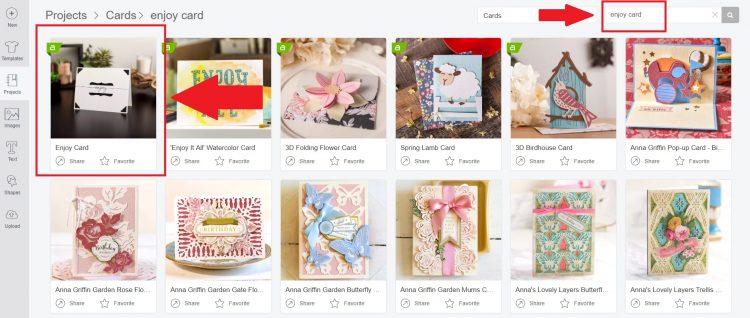
To make this tutorial more streamlined, I want you to pick the same project as me to get started. So once you are logged in to the Design Space online, simply click on the ‘Cards' category. You will now see hundreds of cards that are ready for you to make – pretty cool huh!!
Click in the search box and type “Enjoy Card”.
Once you click on the card, you will see a beautiful tutorial card popup. This card provides info on the materials you will require, the time you should set apart as well as the steps that are required to create an exact copy of the project.
Click on “Make It” and let's get to it.
2. Draw and Cut
Your first step in the card creation is to test the “draw and cut” feature. What I love about the Cricut Machines is that they can do so many different things. You can simply cut designs that you pick/create/upload to Design Space, but you can also Draw and Cut (great for cards), you can Print then Cut (great for die cuts) and you can even score (great for 3D models and boxes).
For now, the project will simply open and everything will be done for you. As you can see, the machine will cut your cardstock down to card size and it will also write your card message as well.
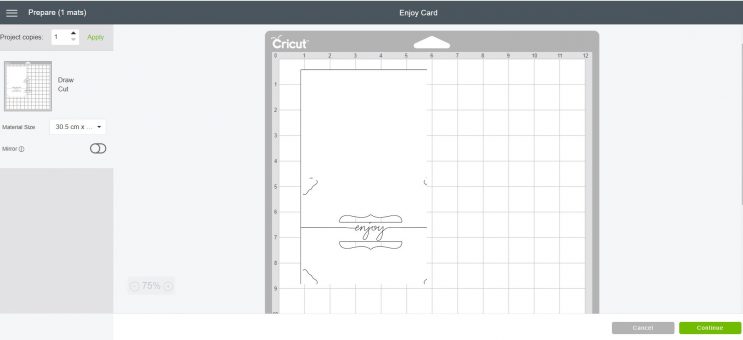
Click on “Continue”.
Your machine will walk you through the steps of what is required next, but I will summarize them here for you as well.
3. Select Your Material
It is important to select the right material in order for the machine to know how much pressure it has to apply in the cutting process. The steps on how to select the material is different depending on whether you have a Cricut Explore Air 2 or a Cricut Maker.
How to Select the Material on a Cricut Explore Air 2:
Your Cricut Explore Air 2 has a smart dial that is located on the cutter.
The Smart Set Dial is a material selection dial which is pre-programmed with the correct settings (cut pressure, speed, depth, and force) for whatever material you want to use.
The dial has predefined settings for Paper, Vinyl, Iron-on, Light Cardstock, Cardstock, Fabric, and Poster Board.
You can also use half-settings between the materials on the dial. This is useful for times when you need either a little less or a little more pressure than one programmed setting.
Of course, there's a custom option as well. This gives you the option of choosing settings for up to a hundred different materials.
So go ahead and turn the dial to cardstock.
Then select the exact material you’re cutting from the huge drop-down list in the Design Space software — the Cricut will automatically adjust the blade settings for you.
How to Select the Material on a Cricut Maker:
The Cricut Maker is really easy to use. All you have to do is to select the right material in Cricut Design Space and the machine will automatically calibrate the pressure, speed and depth for you.
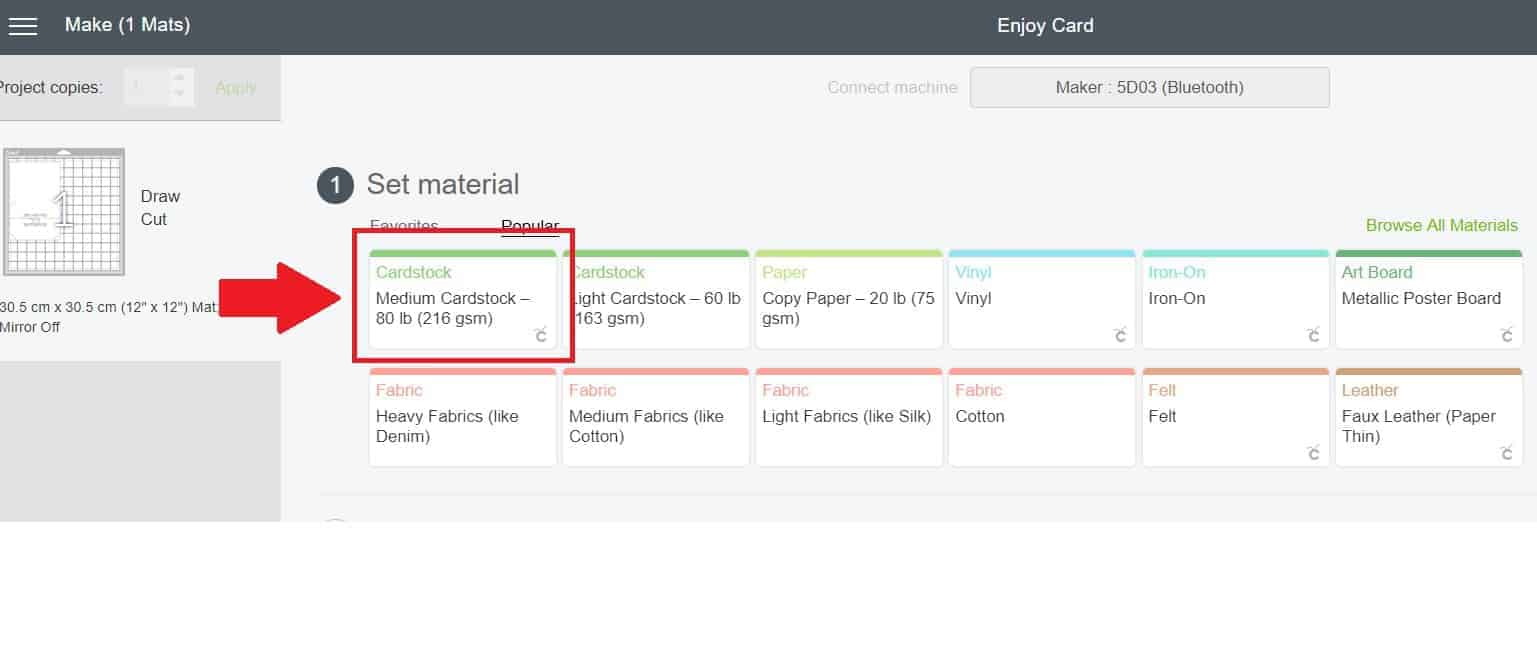
So go ahead and select ‘medium cardstock' from the options.
4. Load Tools & Mat
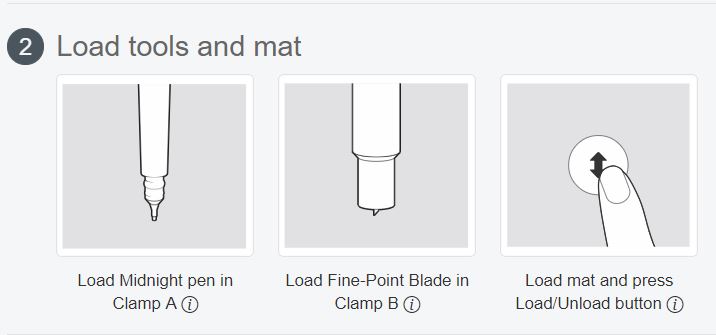
Place your cardstock on top of the green sticky mat. Lined it up on the top and on the left of the mat.
There are four types of Cricut mats available – Light grip (blue), Standard grip (green), Fabric grip (purple) and Strong grip (purple). You need to match the right mat with the right material.
Next, you will need to load up your black pen in the adaptor.
Make sure that you have the fine point blade installed in the Cricut. You can learn more about the Cricut blades and how to install them here.
Lastly, load up your mat into the machine.
And lastly, press ‘GO' – find the flashing Cricut logo button.

Now, you just have to sit back, relax and wait for the machine to cut out your bits and write your message.
Simply follow the instructions on your card tutorial to complete your card. So easy right!!
Now I'm sure you are booming with excitement and you are wishing you could get into so many more projects, so here are a few more instructions on some of the other functions that are available.
Cricut Basics: How to Select an Image to Cut
Suppose you want to create some flower vinyl stickers. How do you go about selecting an image to cut in Cricut?
Step 1: Simply create on “New Image” and then choose “Images” and search for flowers. You can also choose “Upload” and upload an image that you loved from the web as well.
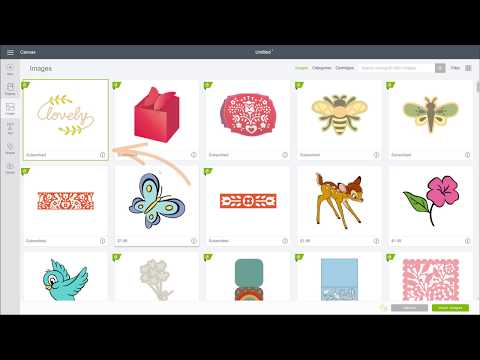
Step 2: Resize your flower to the correct size.
Tip: You can also pick a particular layer of design or change the color. When cutting, be sure to load that color of paper or vinyl into the mat. All matching colors in your digital design will be cut from the same material.
Step 3: Once you have decided on your shape, click “GO”. If you want to cut multiple flowers, just adjust the Project Copies number to the number of flowers you want.
Cricut: How to Use the Print then Cut Feature
You also have the ability to print out images through Cricut Design Space using a printer. You can then transfer the printed paper or cardstock to your cutter and get your cutter to cut out the images.
This is brilliant for when you want to create your own stickers, die cuts or labels and tags.
Simply upload your image to Cricut Design Space, make sure that your image is flat. You can flatten layers by clicking on the ‘Flatten' option on the bottom right of the page. Once the image is flat, it will automatically switch over to “Print then Cut”.
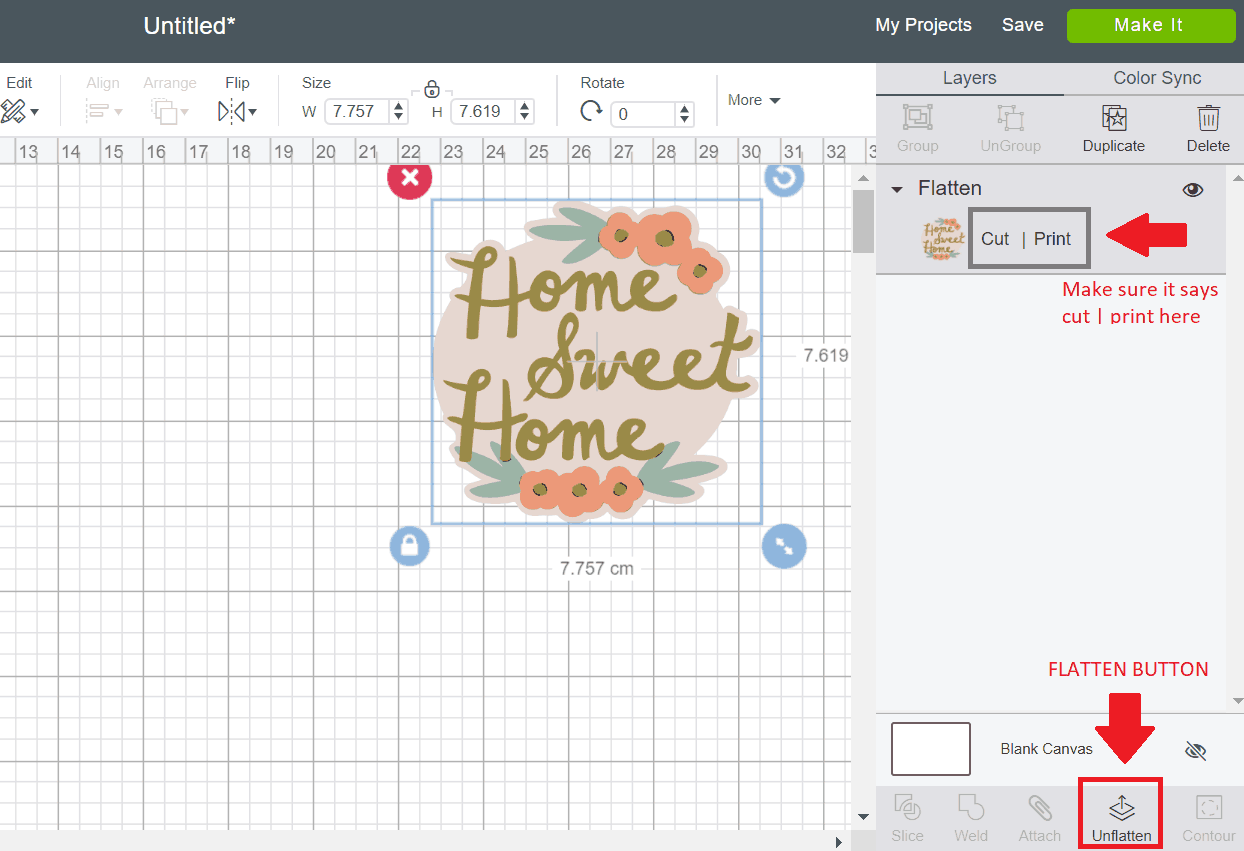
Simply follow the instructions on the create page.
How to Create Text With the Cricut Machine
You also have the ability to write on the Cricut Software. This can be great when you want to create a vinyl text decal for decoration purposes. Or you could get the machine to write with a pen (such as on the card example above).

You can even upload new fonts to Cricut Design Space as well.
Step 1: Click on “Text” in the Cricut Design software and write out the text you want in your design.
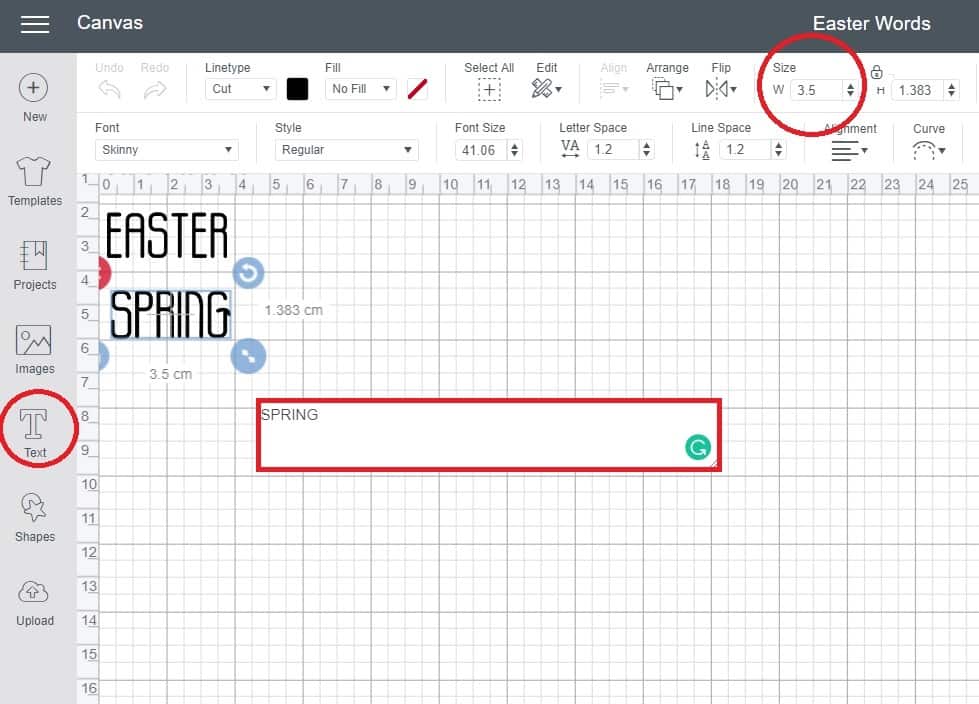
Step 2: Select the font, size, spacing of the letters and rotation.
Step 3: If you wish to create a vinyl sticker, select the “weld” function on the bottom right-hand side to ensure that your cutter sees the letters are one image.
OR
If you wish to write with your pen, insert a pen of your desired color into Accessory Slot A, and the machine will automatically write the words. (You can also select to cut the shape out as well).
Cricut Instructions: How to Score with the Cricut Cutter
You can also create score lines with your Cricut. This is really helpful when you love creation cards, envelopes or 3D models such as houses. The Cricut Explore Air 2 can score using the scoring stylus, whilst the Cricut Maker can score single or double lines with the scoring wheels.
Here is a video to show you how to use your scoring stylus in the Cricut Explore Air 2:

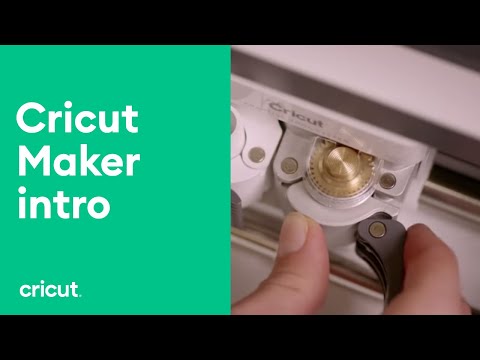
Here is a video to show you how to use your scoring wheel in the Cricut Maker:
List of Cricut Resources & Cricut Tutorials for Beginners
Now that we have covered Cricut beginner basics about how to use a Cricut machine, I also wanted to share some helpful resources with you.
- Massive Cricut Machine Resource Hub: Reviews, Guide, Tutorials & More!
- How to Clean your Cricut Mats
- How to make Shirts with Cricut Machines [ The newbie-guide]
Cricut Resources Specifically for the Cricut Maker
- Must-Have Cricut Maker Accessories, Tools & Supplies
- 10 Things You Didn’t Know The Cricut Maker Could Cut
- 12 Things you Should Know Before Using the Cricut Knife Blade
- 10 Essential Tips To Know When Cutting Fabric with the Cricut Maker
- Cricut Maker Blades: Everything You NEED to Know
- What Type of Projects Can you Make with the Cricut Maker?
- 15 Fabric Cutting Projects You Can Make With The Cricut Maker
Cricut Resources Specifically for the Cricut Explore Air 2
- 10 Fun and Fabulous Cricut Explore Air 2 Christmas Craft Ideas!
- 10 Reasons Why I Love the Cricut Explore Air 2 Machine
- List of Cricut Explore Air 2 Beginner Tutorials
Thus ends our guide on how to use a Cricut machine for beginners.
We hope it has helped you get a better handle of what to expect from the Cricut Machine and how to use it. If you're a beginner, start slow, follow the instructions on the screen, and you should be good to go.
Until next time!
Sam xxx