Are you a Ciruct beginner and a newbie to all things Cricut?
Looking to make your first project? It may be no surprise that one of the most popular and easiest Cricut crafts to create is a personalized t-shirt!
So if you are looking to create a custom shirt for yourself or even for your family and friends using Iron-On Vinyl (HTV) then this is the perfect beginner's guide and tutorial to help you get started with your new Cricut machine.
This great beginner step-by-step tutorial is perfect for any new Cricut user as I walk you through all the steps to make using your machine simple and easy!
I have put together the perfect Cricut beginner's guide on how to create a custom t-shirt design with your Cricut and some HTV!
Heat Transfer Vinyl (HTV) is an amazing product! Personally, I love using HTV to make super cool custom t-shirts. But it doesn't stop there!
You can also use HTV or Iron-On Vinyl to create designs on so many other base materials and blanks like canvas tote bags, shoes, hats, caps, and a ton of other things too.
How to Make Shirts with Cricut Machines (The Step-by-Step Newbie-Guide)
If this is your first Cricut machine and you want to make a great first project using your Cricut craft machine then read on!
All you will need is your new machine, HTV (heat transfer vinyl), and a heat press to create your designs!
I am using the Cricut Maker 3 in this tutorial but you can also create vinyl designs using all of the different Cricut machines. The steps or prompts may be slightly different when you send to cut your design but you should still be able to follow along.
Once you have followed my tutorial on how to make a Cricut T-shirt with your Cricut machine and HTV you will be able to create so many other projects as the steps will be similar for so many other creations!
Supplies Needed
- Heat Transfer Vinyl
- Cricut EasyPress Heat Press
- Cricut Cutting Machine (I used the Cricut Maker 3 but you can also cut HTV with a Cricut Explore Air machine or the Cricut Joy)
- StandardGrip Cutting mat
- Scraper
- Weeding Tool
Step 1 – Get Your Design Ready in Cricut Design Space
Here is a step-by-step guide to making easy Cricut projects like a t-shirt with your own design or a design in Cricut Design Space.
Not only will I give you all the steps but I will share with you the best tips to create great heat transfer vinyl projects with your Cricut machine.
- The first step to getting started is to head over to your Cricut Design Space account and choose to create a new Project.

- You can choose from an image in the Cricut Design Space or upload one of your own.
>>> Not sure what image to use or what may look good and are in need of some inspiration? Why not take a look at these super cute Cricut shirt ideas for more ideas – I am sure you will find a design or image that you love!
Option 1 – Using a Design in Cricut Design Space
- When choosing an image in Cricut Design Space, the first thing you need to do is click on ‘Image' on the left-hand side toolbar panel.

- Next, to search for an image type what you are looking for in the search bar and click on “Browse All Images”.

- Once you find an image or graphic that you would like to use, select it and click ‘Add to Canvas'.

Option 2 – Use Your Own Design by Uploading Cut Files (SVG File)
If you would like to use your own iron-on vinyl designs or SVG rather than the designs in Design Space you will be pleased to know that you can!
All you will need to do is upload your own cut files or SVG file into Design Space.
And as I want to make sure I make using your Cricut machine as easy as possible, I have detailed the steps below on just how to add your own cut files and images!
>>> TIP: Check out our list of the best free images and SVGs here!
- First, select ‘Upload' on the left-hand side toolbar to get started with uploading your saved SVG file.

- Click on the ‘Upload Image' button.

- Next, you can either drag and drop your SVG file into Cricut Design Space or click ‘Browse' to find your saved file on the device that you are using.

- Once you have found the saved file select it and add it to Design Space.
- Your SVG file should show in Design Space and show as a “Cut Image”, if not make sure to select “Cut Image”.
- Now click ‘Upload' to add the SVG file to the list of uploaded images you have added to Design Space.

- You will now see all of the images you have uploaded to Design Space.
- Select the image you would like to use as your design for your project.
- Now click ‘Add to Canvas'.

- Once you have selected the image you want to use either from the Design Space images or from your uploaded SVG file and added it to your project canvas, the next step is to resize your image to fit onto your tee!
>>>> TIP: If you have no idea what size decal is best suited for the size of your t-shirt then you can look at our size guide below. This is just one of the many Cricut Cheat Sheets from our Cricut Cheat Sheet Book!
This is the perfect Cricut book to use when crafting with your Cricut machine so you get the perfect size for your vinyl decal. The book even has adhesive vinyl decal sizings for popular custom projects like mugs, tumblers, and more!

- Select your image.
- Now you can drag the square around your image to resize it.
- Or you can also adjust the size by using the “Size” option in the Edit Bar and change the width and height measurements.

- When you are happy with the size of your design you can click ‘Make It'.

Step 2 – Get Ready to cut
The next step to making your custom t-shirt design is to get your machine ready to start cutting your HTV.
- Make sure to turn on your Cricut Machine by pressing the power button on your machine.
- You will be prompted to select whether you are using a cutting mat or not.
A StandardGrip cutting mat is needed for all main types of vinyl materials other than Cricut materials like Cricut Smart Materials. In this example, we are using normal heat transfer vinyl and not Cricut Smart Iron-On Vinyl, so will be using a cutting mat.

- Once you have selected whether to use a mat or not, you will then need to select the ‘Mirror' icon.
>>> Note sure what Mirror means or why you should use the Mirror option. When using HTV you want to select Mirror as this will ensure that your design is horizontally flipped (or reversed) and will therefore be the right way around when it is applied to the t-shirt using your heat press.
- Now, click on “Continue”.

- The next step is to select the material type that you are using. I am using standard HTV so I have selected Everyday Iron-On. If you are using glitter HTV then make sure to select this type of base material from the list so your machine knows what pressure to use when cutting through the material.

- Place your heat transfer vinyl on your mat glossy side down.
- Follow the prompts in Cricut Design Space to load your fine-point blade for cutting.
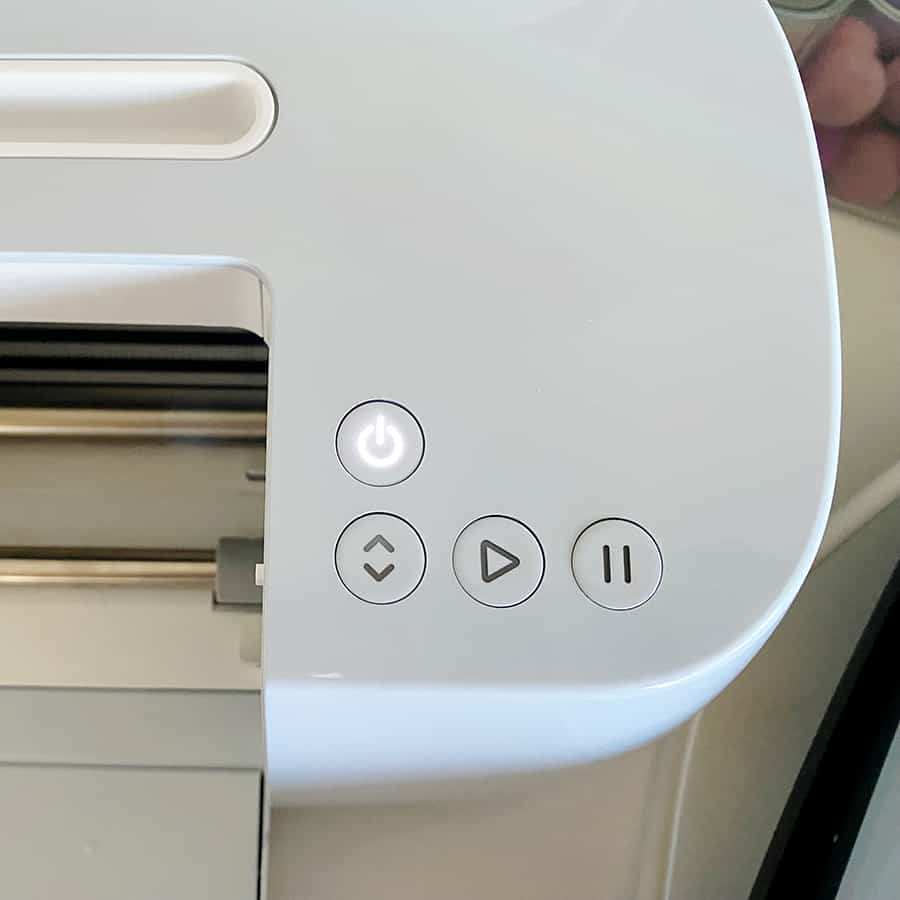
- To load your mat, place your mat on the tray and just under the rollers. Click on the button with the up and down arrows and your machine will pull the mat in to load it.
- Next, click on the Go or Start button.
- Your machine will start cutting the design on your HTV.
>>> Tip: The buttons on your Cricut machine will light up to show which button to select to load the mat and start the cutting process.

Step 3 – Weeding Your Design
Your base material has now been cut!
The next step is not to weed your heat transfer vinyl before using your Easy Press to heat press your design onto your tee!
Weeding vinyl is the process of removing the negative space or the pieces of vinyl from your design that you will not be using after it has been cut with your Cricut machine.
- This is where your weeding tool will come in handy! Using your weeding tool pick and remove the pieces that do not make up part of the design.
- You can remove larger pieces of the vinyl from the design by lifting a corner and slowly pulling it away from the transfer sheet.
- When you finished weeding and removing all the pieces you will see your design!

>>>> TIP: Refer back to your original design to be sure that you have weeded all of the excess vinyl and are not missing any small pieces.
For more details on how to weed, take a look at our guide on how to weed and transfer vinyl with ease!
Step 4: Transfer Your Design to Your Shirt
Now you have finished weeding, it is time to finally press your design onto your tee!
My go-to heat press is the Cricut EasyPress! It may be in the name, but it really does make it so easy to press your favorite designs onto almost any blank!
- Start by using your lint roller to remove any pieces of lint from your t-shirt to make sure it is all ready for your design!
>>> Looking for the perfect t-shirt for vinyl pressing? Take a look at our guide to the best blank T-shirts to help you get the perfect tee for your project. Having the best blank is key to ensuring you get the best results!

- Next, use a t-shirt alignment tool to measure where your design should be. I love using the alignment tool as it really does make placing your HTV decal for your shirt easy.
- If you do not have an alignment tool you can simply fold your t-shirt in half and use your heat press to add a small crease line as a center point!
>>> Tip: I also add a small fold on my HTV transfer sheet at the top to show the midpoint for the design so I can align the two midpoints when placing the design before pressing!

- Turn on your heat press.
- Set your time and temperature according to the guidelines for the HTV material that you are using.
Not sure what time and temperature settings to use? We have a handy guide in our Cricut Cheat Sheet Book which gives you all the settings to use and so many other important instructions to ensure your t-shirt looks as good as it can!

- When the heat press has reached the correct temperature it is time to start pressing.
- If you want to protect your t-shirt you can use a piece of parchment paper or butcher paper on top of the decal or even a Teflon sheet.
- Place your heat press on your t-shirt and press start on your heat press.
- When the heat press has reached the time setting remove the press from your shirt.
- If your press is smaller than your design, you will need to press the part of the design that was not covered by the press when you did the first pressing.
- When you have pressed the whole design, peel off the backing sheet and your design will stay on your t-shirt!
>>> Tip: Make sure to check if your HTV is cool or hot peel. If it is cool peel you will need to leave the backing layer to cool before trying to peel it off. If it is a hot peel, make sure to peel the sheet away as soon as possible.
And there you have it…..
A great-looking t-shirt that you created using your Cricut cutting machine, heat transfer vinyl, and a heat press machine!

Final Thoughts and Tips on How to Make Shirts With Your Cricut
We hope you find this Cricut beginner tutorial really helpful for making your very own heat-transfer vinyl t-shirt!
This is a complete guide on how to add and upload your own images and SVG files to Design Space, resize your image, and send your design for cutting when using a Cricut machine with is one of the best home electronic cutting machines.
Remember, practice makes perfect, so if it doesn't go your way the first time, then try and try again!
One final piece of advice for the aftercare of your tee to make sure your design lasts for a good while is to, always try to wash your t-shirt inside out!
Have fun designing your T-shirts!!
Share your designs with me as I would love to see what you are creating with your new Cricut machine!
>>> Looking for more tutorials and tips? Head over to our Cricut Resource Hub for more great Cricut tutorials and craft ideas for beginners!

