So you have bought your very first vinyl cutter machine, and you have figured out how to cut your first vinyl design with it.
But now what? What does weeding vinyl even mean? How do we remove all that excess vinyl (aka how to weed) so that we are only left with the beautiful vinyl decal?
In today's post we will have a look at what weeding vinyl means, which tools you should buy, as well as how to weed step by step.
What Does Weeding Vinyl Mean?
Weeding is a process in which the unnecessary excess vinyl is removed from a design. It can be particularly tricky to remove intricate detailing, especially when working with small designs.
Weeding is indeed an art that you will become better at as you practice. To keep the process of weeding as easy as possible for you, we have decided to share some tips and tricks from our in-house vinyl expert.
Here is a great guide on how you weed your adhesive backed vinyl.
Tools Required to Weed Vinyl
Whilst you can indeed weed vinyl with anything sharp like a needle, it definitely is a lot easier to weed when you have the correct tools. Here is a list of the tools we recommend for a beginner.
- Xacto knife (to quickly trim down the excess vinyl)
- Weeding hook (to pick out the intricate vinyl bits)
- Weeding Tweezers (can be helpful when you need to place tiny vinyl bits back in place)
- Scraper (to help secure the vinyl down on your item)
- Weeding ring (not essential but I find mine very handy)
- Transfer Tape (to transfer your vinyl decal to the item)
Here is a handy little kit that you can buy with some great tools at a super affordable price.
How To Weed Vinyl
Now that you know which tools you should be using to weed vinyl, let's have a look at the exact steps you should take to weed your adhesive vinyl.
Weeding vinyl decals for the first time might seem like a daunting process, but once you have done it successfully you will realize that it is actually pretty easy.
Step 1:
Of course, you will need to cut your vinyl with your preferred vinyl cutting machine. Next, you will want to lay your unweeded vinyl reading-direction up (so the words are visible to you) out on a surface that is suitable for cutting.
Use an Exacto knife (or scissors) to quickly cut around the design.
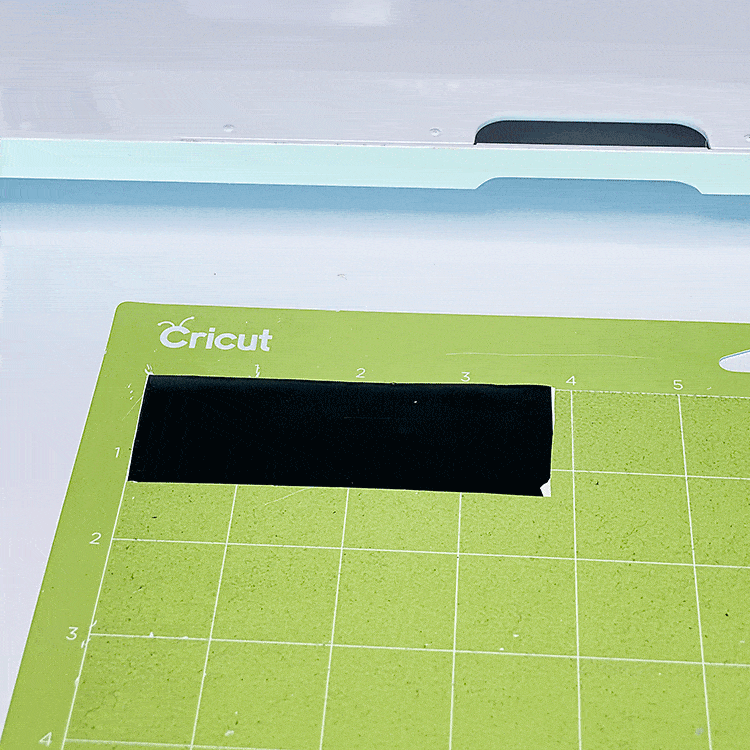
I like to place my vinyl back onto the sticky mat to prevent it from moving around too much whilst weeding.
Step 2:
Next, simply peel away the remaining excess vinyl as you would peel a sticker.
We find that it is best to start in one corner and pull down towards the opposite corner.
If you struggle to lift up the corner with your fingers, try poking the weeding tool through the top layer. Work steadily and rather slowly to prevent your vinyl design from pulling up as well.
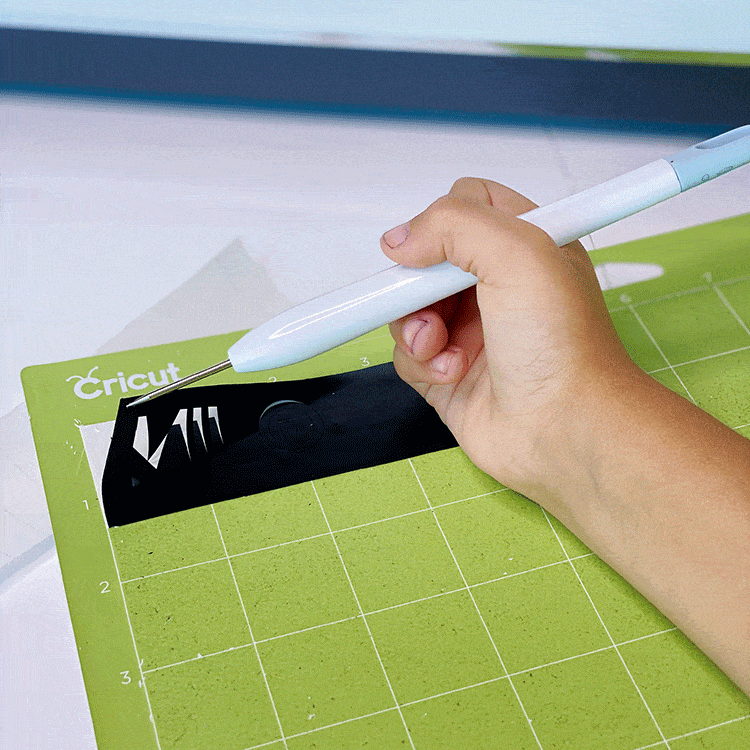
Step 3:
Lastly, you'll need to carefully weed out any openings or separations, which will include holes in letters.

Whilst people use all sorts of different tools to do this, we find that the weeding hook does a brilliant job of grabbing those small intricate details.
Step 4:
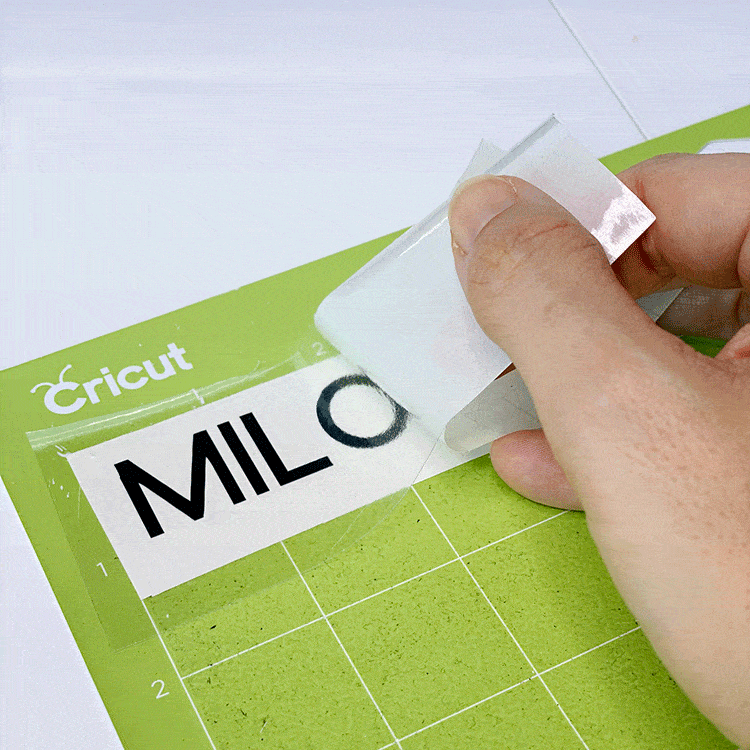
Cut a piece of transfer tape that is slightly larger than your design (you can find a list of the recommended vinyl transfer paper to use here and here is a post with more detailed information on how to use transfer paper).
Cover the design in transfer tape – try to work slowly to avoid bubbles and wrinkles.
Use the scraper to tub over both the front and the back of your vinyl to make sure the tape has adhered securely.
Leave this to sit for a few minutes. You are now ready to transfer your vinyl on to your item! See the steps on how to transfer vinyl below.
Tips for Weeding Vinyl
Tip 1: When working with designs of smaller portion cuts, you could tape out the entire cut to a board or table. This will help keep the vinyl secure whilst you pick out all the small details.
Tip 2: It can be helpful to make use of a weeding box around your text. You could also try to reverse weed when you are working with tiny letters or designs.
Tip 3: If you have a detailed intricate design, make sure to print your design on printer paper. Place this picture in front of you when you are weeding so that you can see what needs to be done.
Tip 4: If you are a beginner we recommend that you start off with a large size decal that is pretty basic in design. Leave the intricate small decals for when you are more experienced.
Tip 5: Once you become comfortable with weeding, you can try out reverse weeding which is perfect for small or fine letters.
How to Transfer Vinyl
In order for you to apply your vinyl to a new surface, you have to peel the backing off the vinyl transfer sheet. Then you have to press the vinyl on top of the final design that you've made.
Step 1:
Carefully and slowly peel off the tape from the vinyl backing sheet. Again I like to start in one corner and slowly work my way diagonally down and across the design.
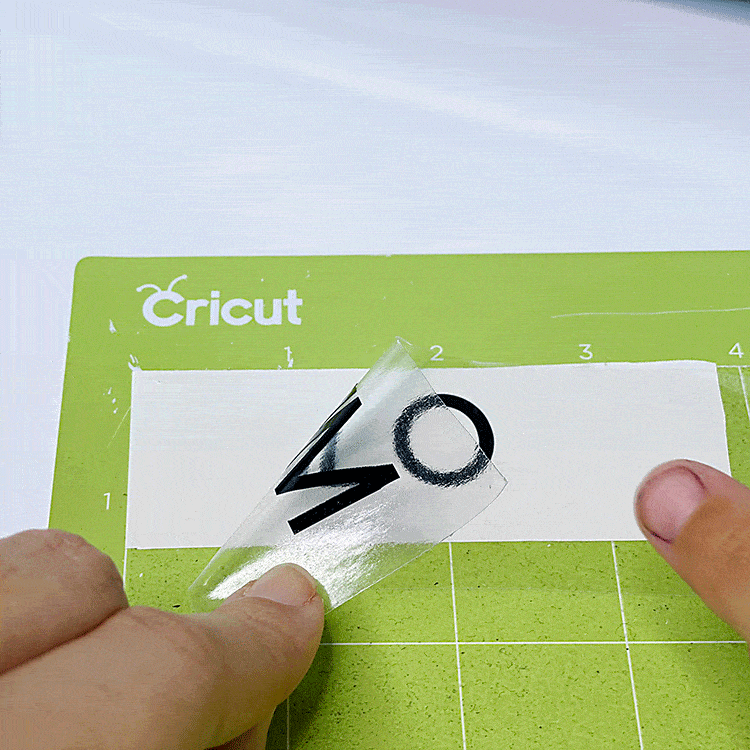
You should hopefully peel up the entire design which should now be sticky so that you can stick it to your item.
If you have some bits that did not peel up, simply lay the transfer paper back down and use the scraper to firmly rub over that problem area again.
Step 2:
Carefully transfer your design onto the item you wish to decorate. Take the time to ensure that the design is exactly where it should be (is it straight? is it centred? etc.).
Once you are happy with the placement, use your scraper to adhere the decal on to your item.
Step 3:
Nearly done! Simply grab the corner of the application tape, carefully pull it away, and your vinyl design is complete!

Again if you find that some of your letters or design is lifting up with your tape, simply place it back on and apply pressure as your rub over that area.
Tips for Transferring Vinyl
Tip 1: Don't be stingy with the transfer tape, use a generous amount that is much larger than your design.
Tip 2: If this is your first transfer, we recommend you pick a flat item to decorate. Keep the curved items till you are more experienced.
Tip 3: If you are nervous, you might like to spray your receiving surface with some application fluid. It will give you more time to play around with the placement of the design (around 30 seconds) before the placement becomes permanent.
Tip 4: If you are working with a glass or ceramic surface, give the surface area a wipe with some rubbing alcohol.
Tip 4: Poke any bubbles trapped in the vinyl with your Xacto knife tip, and then smooth them down through a sheet of paper. I've also seen people heat up the end of some tweezers and then use the heated metal to smooth out the bubble areas.
And there you have it! You have completed your very first vinyl transfer. I realize it might have taken a bit of time, but the more you do it, the quicker you will get at it.
Start easy. Go for a large bold design which will make the weeding process easier. Work on a flat surface rather than a curved surface.
Keep in mind that some brands of vinyl (cheaper bulk packs from Amazon) can be extra hard to weed so if you are struggling try out a different brand of vinyl. It is also important to use the right type of transfer tape.
If your transfer tape is too sticky, you will struggle to release your letters onto your new surface. If you are using glitter vinyl, you will need to use a stronger transfer tape.
May the vinyl force be with you.
PLEASE PIN ME!
Why not save these pins for easy reference.
 |  |