If you have heard of Cricut Infusible Ink you may be intrigued to learn more about this amazing product if you have not already used it yet.
I am sure that you have a hundred questions about this product like is it a different type of vinyl? Do I need any additional tools? What materials or surfaces can I apply it to?
These are all great questions and in this Beginners Guide to Cricut Infusible Ink we are going to let you know all the Infusible Ink basics and answer all the questions we get asked about this product.
We are also going to share with you lots of different tutorials that you can create using Infusible Ink Transfer Sheet and Pens.
What do you Use Cricut Infusible Ink For?
Cricut Infusible Ink is a product from Cricut that is similar to sublimation ink. Infusible Ink takes your projects to another level by adding vibrant colors to your designs.

It is a brilliant product to use if you want to move away from using Heat Transfer Vinyl (Iron-On). Using Infusible Ink also gives your projects a much more professional look and finish.
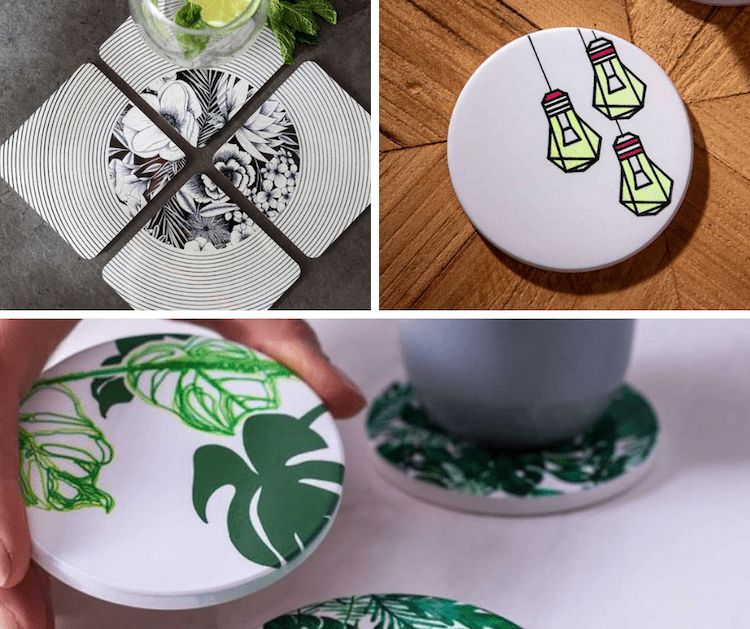
You can use it on many Cricut Infusible Ink blanks like canvas bags, shopping bags, canvas shoes, hats, caps, sublimation mugs, coasters and so much more.
What Material does Infusible Ink Work on?
Before we look at what materials you can use Infusible Ink with, it is good to understand the basics of this product.
When heated, the Infusible Ink infuses with the fibers of fabric items or dyes the special coating that is applied to ceramic items like mugs or coasters to transfer the designs.
Now you may be thinking that HTV or Iron-On also uses heat when applying the design so you can use the same items. Although they both use heat, you cannot use Infusible Ink on all of the same items that you would apply iron-on or HTV on.
To achieve the best outcomes for Infusible Ink transfer make sure to use Cricut Infusible Ink products (Infusible Ink compatibility badge on the packaging).
Or if you wish to use non-Cricut brand products, look for blanks that can be used for sublimation as they have a special coating applied to the allow the ink to fuse with the item.
When applying Infusible Ink to fabric items, they need to be as close to 100% polyester as possible.
What is the Difference Between Sublimation, Infusible Ink, and HTV?
Although all these products use heat when transferring to your item, there are some differences that you need to know so you can make sure you use the correct product for your desired outcome.
| INFUSIBLE INK | SUBLIMATION | HTV (IRON-ON) |
|---|---|---|
| Lightweight when applied to the base material as colors infuse with the material. | Lightweight when applied to the base material as colors infuse with the material. | The end result will be slightly heavier even when using lightweight HTV. |
| Image/design stretches with the fabric. | Image/design stretches with the fabric. | Most iron-on vinyl does not stretch. |
| Has a smooth seamless finish. | Has a smooth seamless finish. | Available in different textures such as smooth, flock, or glitter and has a raised feel. |
| Ink infuses into the fabric. | Ink infuses into the fabric. | Vinyl adheres on top of the fabric. |
| Never flakes, peels, cracks, or wrinkles. | Never flakes, peels, cracks, or wrinkles. | Can crack, peel, flake, and wrinkle over time. |
| Sold in pre printed transfer sheets with solid and patterns. | You can create your own patterns, color palettes, and designs, | Available in solids, patterns, glitter, holographic, flock, and many more. |
| Works best with a heat press or EasyPress. | Works best with a heat press or EasyPress. | Can use an iron, heat press, or EasyPress. |
| The heat press plate needs to be larger than the design. | The heat press plate needs to be larger than the design. | The design or image can be larger than the heat press plate. |
| Only work with compatible blanks. | Only work with compatible blanks. | Works with most surfaces. |
| Works on light or white materials. | Works on light or white materials. | Can be used on any color material. |
| Apply to 100% polyester fabrics. | Apply to 100% polyester fabrics. | Can be applied to almost all fabric types. |
| Limited to the number of layers that can be applied if using different Infusible Ink sheets or colors. | You can create a design with multiple colors/layers so that you can press your design in one go. | Can layer multiple layers of vinyl without issues. |
| Requires Cricut machine to cut designs. | Requires a dedicated sublimation printer to print out designs. | Requires Cricut machine to cut designs. |
From the table you can see that there is quite a difference between Iron-On and Infusible Ink.
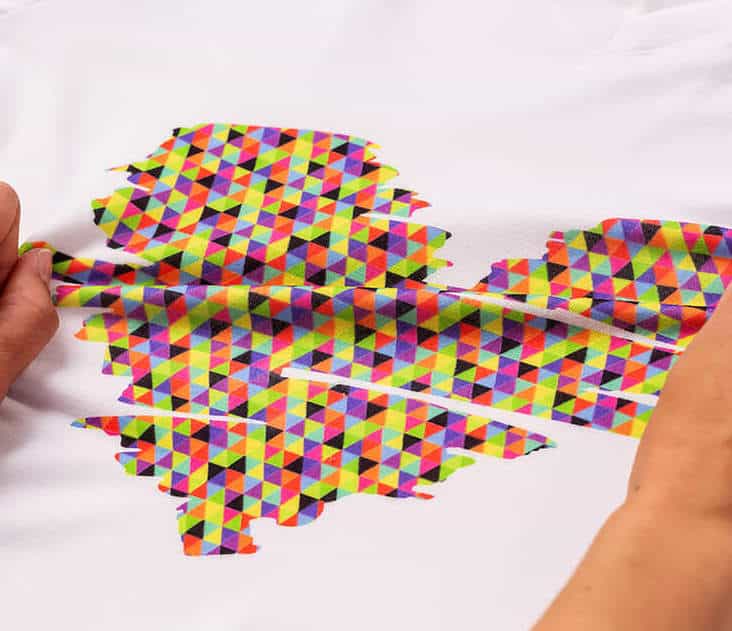
Sublimation Ink is very similar to Infusible Ink however the main difference is that Cricut Infusible Ink sheets come on a clear liner and the design is cut and weeded away.
Sublimation uses a sublimation ink printer and paper that is self-weeding. This means that when pressing the design only the printed areas will be transferred to the item.
Is Infusible Ink Permanent?
Yes, Infusible Ink is permanent as the ink is infused or dyes the fabric when the heat is applied.
As the ink is absorbed into the fibers this means that there is no flaking or peeling – such a game changer to HTV that sometimes lifts from your project especially if you have not applied the correct heat, pressure and time settings.
To ensure that your Infusible Ink project stays as vibrant as the day you make it we cover how to care for your Infusible Ink projects further down in this guide.
What do I Need to Get Started with Infusible Ink?
Below is a list of everything you will need to use Infusible Ink. It is important to note that Cricut makes Infusible Ink Transfer Sheets and Infusible Ink Pens and we will cover both of these below.
- Cricut cutting machine (you can use the Cricut Maker machines, Cricut Explore machines or the Cricut Joy machine)
- Cricut Infusible Ink Transfer Sheets
- Cricut Infusible Ink Pens
- Heat Transfer Tape
- Butcher Paper
- Laser Copy Paper (to be used with Infusible Ink Pens)
- Cricut Basic Tool Set (you may want to use the tweezers, weeding tool and scissors)
- Cricut EasyPress machine (best to use as the heat plate needs to be larger than the design). Works best with t-shirts, tote bags, cosmetic bags, coasters, and cushion covers
- Cricut Mug Press machine (for making Infusible Ink mugs or tumblers)
- Cricut Hat Press machine (for making Infusible Ink hats however you can also use a Cricut EasyPress Mini)
- Cricut EasyPress Heat Mat
- Lint roller
- Green StandardGrip cutting mat
It is important to note that you will not need everything from this list. For example, if you do not want to make mugs you will not need the Cricut Mug Press so pick the items from the list that you want to start working with first.
Infusible Ink Basics for Beginners
If you still have questions about Cricut Infusible Ink, read more about this great product from other posts and guides we have written and detailed below for you.
- What is Infusible Ink
- How to Use Infusible Ink Transfer Sheets
- How to Use Infusible Ink Pens (coming soon)
- How to Use Cricut Infusible Ink with an Iron
- Cricut Infusible Ink Transfer Sheet Review
- Infusible Ink Heat Settings (coming soon)
- Layering Infusible Ink: Everything You Need to Know
Infusible Ink Buyers Guides (To Help Save You Money & Research Time)
Got the hang of all things Cricut Infusible Ink but want to know the best places to get Infusible Ink blanks?
Check out our Buyers Guides, where we share the best Cricut Infusible Ink blanks and non-Cricut blanks you can use and where to purchase them.
- Cricut Blanks for Infusible Ink
- Find the Best Cricut Infusible Ink Bundle
- Compatible Non-Cricut Infusible Ink Blanks
- Cricut Infusible Ink Shirts (plus Infusible Ink Compatible Shirts)
Cricut Infusible Ink Project Ideas
Looking for some Infusible Ink project inspiration? Check out these ideas of all the great projects you can make using Infusible Ink.
Infusible Ink Pen Tutorials (On Cricut Blanks)
If you are wondering just how you would use Cricut Infusible Ink Pens then check out these projects where we show you how to create some great items using your pens!
- How to Use Infusible Ink Pens on Shirts (coming soon)
- How to Use Infusible Ink Pens on Mugs
Infusible Ink Transfer Sheet Project Tutorials (Using ONLY Cricut Blanks)
Check out these projects, where we show you how to create great items using Cricut blanks and Cricut Infusible Ink Transfer Sheets!
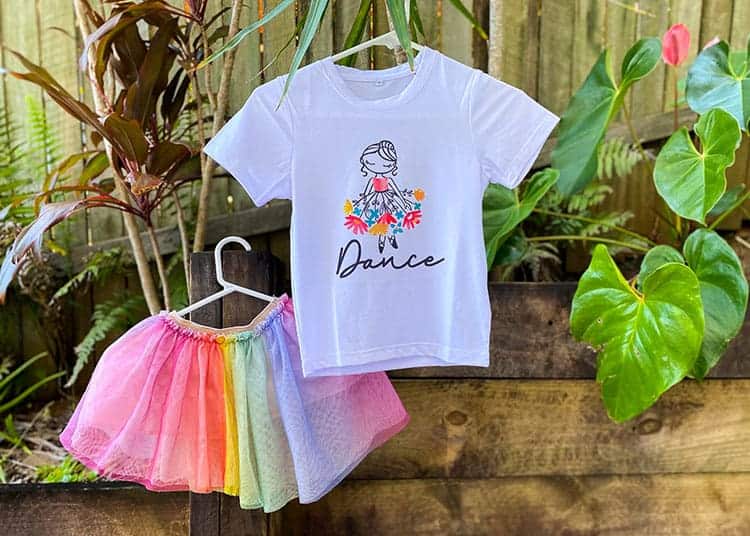
- How to Make Your first Infusible Ink shirt
- How to Make Infusible Ink Coasters
- How to Make Infusible Ink Mugs
- How to Make Infusible Ink Wine Bags
- How to Make Infusible Ink Cosmetic Bags
- How to Make an Infusible Ink Pillow Cover (coming soon)
Infusible Ink Project Tutorials (On Non-Cricut Blanks)
The projects below will show you how to use Cricut Infusible Ink with non-Cricut blanks.
Using Cricut Infusible Ink compatible blanks is excellent as not only can you save costs but there is a greater variety of blanks available compared to the Cricut Infusible Ink blanks.
- How to Use Infusible Ink on Canvas (coming soon)
- How to Use Cricut Infusible Ink on a Puzzle
- How to Use Infusible Ink on Glass (coming soon)
- How to Use Infusible Ink on Cotton (coming soon)
- How to Use Infusible Ink on a Black Shirt (coming soon)
- How to Use Infusible Ink on Wood (coming soon)
- How to Use Infusible Ink on Colored Shirts (coming soon)
Caring for Infusible Ink Projects
If you have used Cricut Infusible Ink, you will want to ensure that you care for the items to ensure your designs last.
If you have made fabric items with Infusible Ink:
- Machine wash inside out with cold water and mild detergent
- Tumble dry low or line dry
- Do not use fabric softener, dryer sheets, or bleach
- Iron if needed (medium heat, no steam)
If you have made ceramic items like mugs & coasters with Infusible Ink:
- Wash with warm water and glass cleaner
- For mugs, you can also wash them in the dishwasher
- Do not use steel wool, colored cleansing agents, or scrubbing pads
Tips and Tricks for Working with Infusible Ink
Below are a few tips and tricks that will help you when using Cricut Infusible Ink.
- Store your Infusible Ink correctly to avoid the color fading or the Infusible Ink Transfer Sheets from being damaged. Always store Infusible Ink Transfer Sheets in their original packaging in a cool, dry location.
- Make sure your fingers are dry before touching your Infusible Ink sheets as wet or oily fingers can cause the transfer sheet to look splotchy or smudgy.
- Place your Infusible Ink Sheet with the design or color side up (shiny side down) on your cutting mat.
- Mirror your design, especially if it is text.
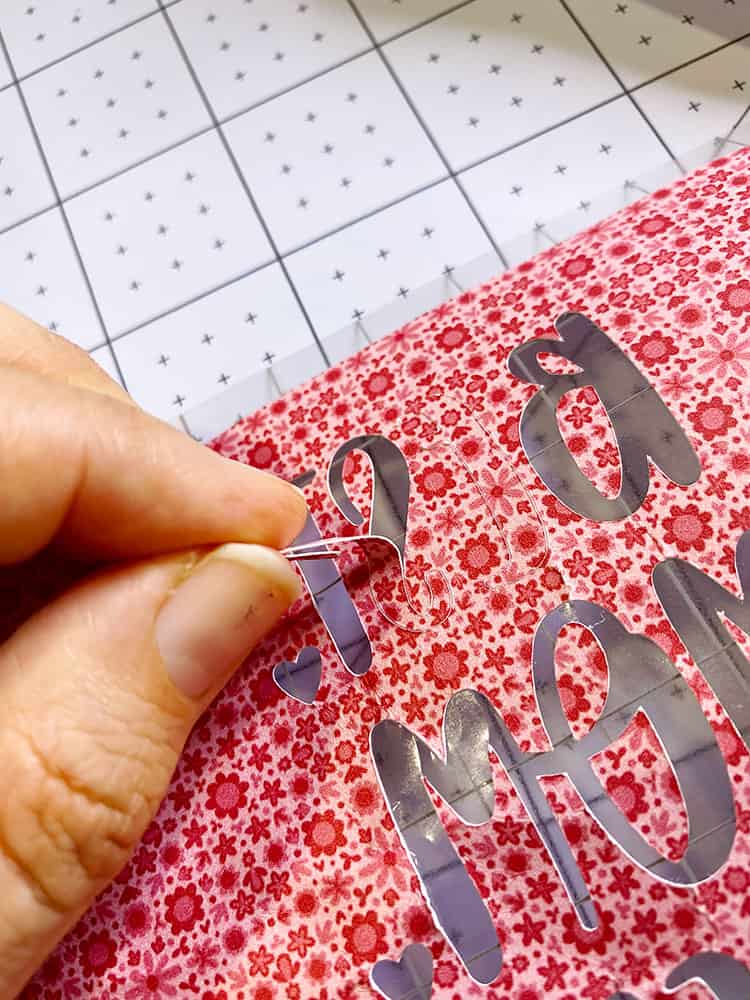
- To weed you Infusible Ink transfer sheet, remove the sheet from the cutting mat and roll the sheet to crack the cuts of the design.
- Send your design to cut twice that way it will cut all the way through the Infusible Ink sheet and you may be able to avoid having to roll and crack before weeding.
- Remove any fibers, lint or dust from your blank by using a lint roller.
- Always use the correct heat, time and pressure settings to achieve the best transfer result.
- Avoid moving your press when applying heat and pressure (if you do move the press, it could move your design and create a ghost effect. You may also have uneven heat application which will have a fading effect on your design.)
- Remove your transfer sheet once your project has completely cooled. This will ensure that you do not have the same effects as the point above.
Is Infusible Ink Toxic?
Infusible Ink is not toxic however it is advised that when you use Cricut Infusible Ink products you are in a well-ventilated area.
This is because the heating process's fumes may irritate sensitive individuals.
If you do experience irritation from using the Cricut Infusible Ink products, Cricut recommends that you immediately wash your skin with soap and water.
If you have irritation with your eyes, immediately flush with water. If the irritation persists, seek medical attention.
Troubleshooting Infusible Ink Problems
Below is a list of the most common problems faced when using Infusible Ink products and the reasons so you know how to try and prevent these from happening when you make your Cricut Infusible Ink projects.
The Image Looks Blurry in Places (known as Ghosting)
If your design looks blurry in places, it moved when pressing and applying the heat, or it was removed before it cooled down completely.
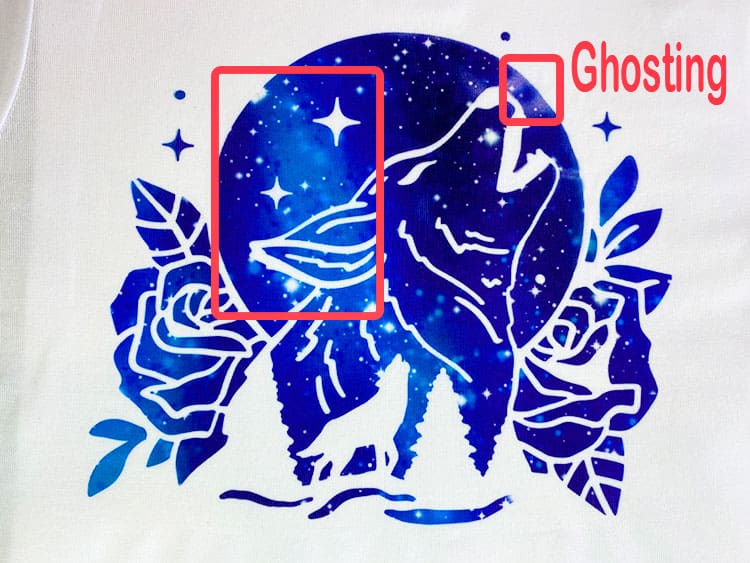
To avoid the transfer sheet or butcher paper from moving, it is important to use heat transfer tape to secure your design in place as much as possible.
Also, do not move your EasyPress around when pressing, and make sure to only remove the transfer sheet once your project has cooled completely.
Do not apply more than one application of heat as applying heat in sections or multiple times may result in uneven color or unwanted marks on your finished project.
The Image Transferred Unevenly
This is similar to ghosting as the image in your finished projects looks faded and uneven in places.
This is caused when not pressing your project for long enough or pressing with too little or too much heat.
Make sure to press your project on a flat and smooth surface. Do not place your design over any seams or zips. We also recommend that you press your fabric before applying the design to remove any creases.
To make sure you get the best finished project it is important to check the Cricut time and temperature settings. Use our handy Cheat Sheet for Heat Press settings.
The EasyPress Leaves Marks on my Project
This happens when you do not protect the fabric with butcher paper when pressing. Make sure that you always use a piece of butcher paper that is larger than your design and heat press heat plate.
This is our complete beginner's guide to Cricut Infusible Ink. We hope that this has answered all your questions that you may have about using this great product.
If you need more help, be sure to leave us a comment below and we will get back to you!