Do you want to use Cricut Infusible Ink on a shirt for the first time?
Infusible Ink is such a fun product to work with, but it works a bit differently from vinyl, so it is super important to follow a step-by-step tutorial to get all the helpful tips and tricks before you start.
Here is a project I would like to share with you, it is a cool Infusible Ink shirt I created for my daughter. She really really loves it and I had so much fun making it. I’m so excited about this tutorial, so let’s get started!
Here is the full step-by-step tutorial on how I created the Cricut Infusible Ink Shirt.
>>> Read our beginner guide if you want to know what is infusible ink?
ow To Use Infusible Ink On Shirts for Beginners
Find below the steps to follow in order to create this beautiful Infusible Ink Shirt. Important to note that your shirt HAS TO BE high in Polyester.
Supply List
- Cricut Blank Shirt (high percentage polyester shirt)
- Cricut Infusible Ink Transfer Sheets (I used the Galactic Stars on this tutorial)
- Butcher Paper (comes with the Infusible Ink transfer sheet box)
- Cardstock or Printer Papers (preferably white and big enough to get inside your blank shirt, I used 12×12 cardstock in this tutorial)
- Cricut StandardGrip Mat(green colored mat)
- Cricut Heat Tape (tape that can handle high heat)
- Lint Roller (to remove all the excess threads and dirt off your blank)
- Scissors
- Cricut Rotary Cutter(nice to have but not required)
- Self-Healing Cutting Mat (nice to have but not required)
- Ruler (nice to have but not required)
- Cricut Tweezers
- Cricut Brayer
- Cricut EasyPress
- Cricut EasyPress Mat
- Cricut Maker or Cricut Explore Air 2
Step 1: Search/Upload your Desired SVG in Cricut Design Space.
In this tutorial, we will be creating our own SVG but you can use whichever SVG you would like to use.
- Search for an image by clicking Images on the Design Panel. Here in this project, we will search for “paint smear”. If you wish to use the exact same image as mine, simply enter the following: #M9A10A80
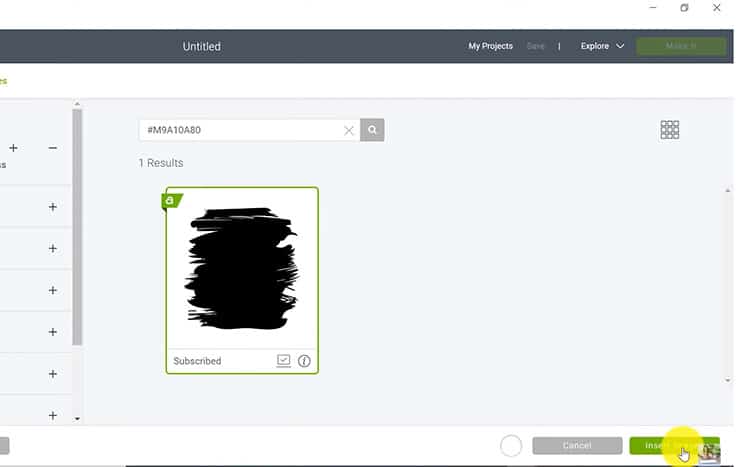
- Choose the image you would like to use and insert the image on to your canvas.
- Let's add some interest to our paint splash. I want to add a word into the centre of the design. Click on Images and search for the word “kind”.
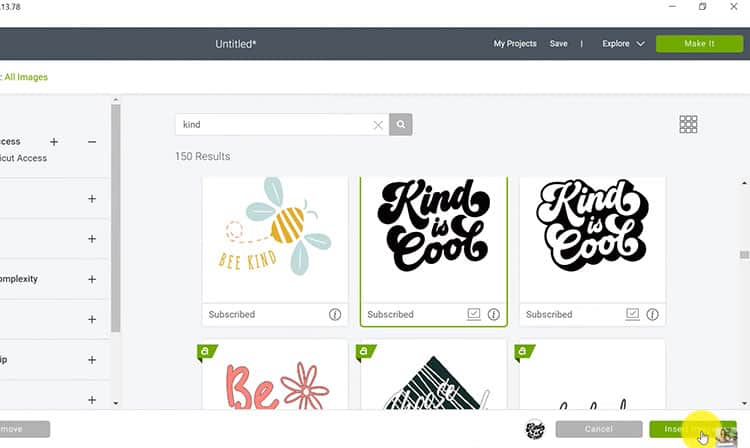
- Select the image and click the Insert Images button at the bottom.
Step 2: Prepare your SVG for Cutting
Once the image is inserted on your canvas, resize, change the orientation or control the image depending on how you like your image to look.
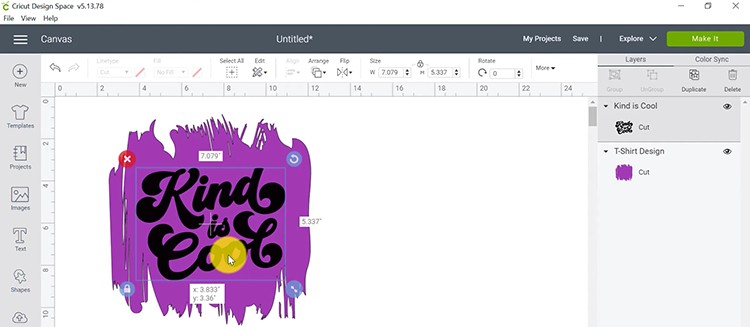
- Once the image is already on the canvas, change the color of the “paint smear” image just so you have an idea of how it will look on your white shirt.
- Place the word over your paint smear.
- Next, let's cut the words out of the paint smear. Select both images by clicking and dragging a box around the images. Click the Slice button at the bottom to cut “Kind is Cool” out of the paint smear.
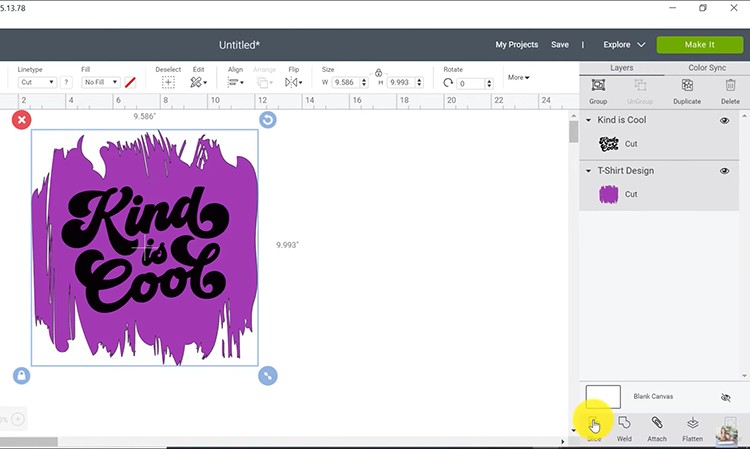
- Another layer of the cut image (Slice Result) will appear, remove the extra sliced pieces by deleting them. You should now have the paint smear with the cut out words.
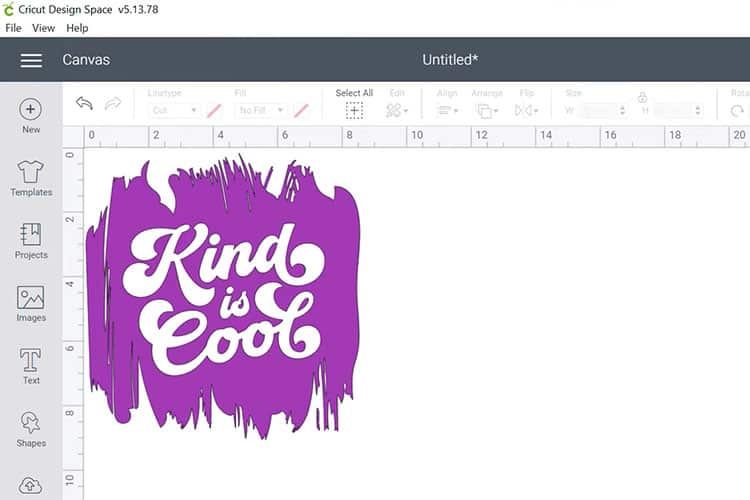
- Size up your image. If you’re making a teen shirt, you may use a ruler to measure it up or if you bought my book Cricut Cheat Sheet Bundle Book (check out the popular book here), you can use it as a reference to find the right measurement. I sized my design to 8.5″ in Width.
- Click the Make It button on the upper right of your canvas.
Step 3: Choose Your Settings on the Cut Screen
Next, let's select our materials and cut settings on the cut screen.
- On the cut screen, click the Mirror toggle button to mirror your image, then click Continue.
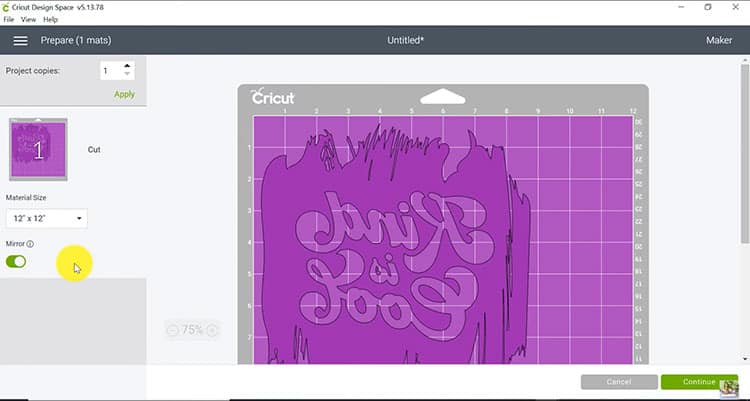
- Wait for Cricut Design Space to connect to your machine. Then select Infusible Ink Sheets
Step 4: Prepare your Material to be Cut
Let's prepare the Infusible Ink Sheet. Infusible Ink has to be placed FACED UP (which is different from Iron-On Vinyl which has to be placed shiny side down).
- Use the StandardGrip mat (green). Make sure that your hands are clean and dry before touching the Infusible ink transfer sheet (because the oil on your fingers can transfer to the sheet). Place the sheet facing up on the mat.
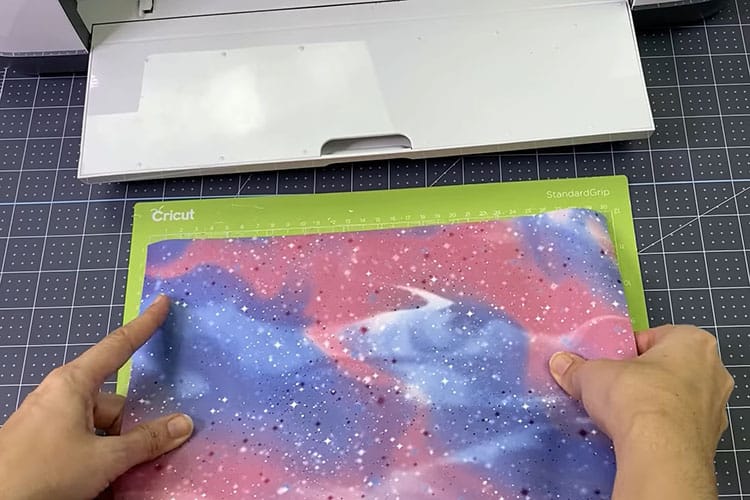
- Use a brayer to smoothen the sheet down the mat. This is to prevent you from touching the Infusible Ink Transfer Sheet.
- Load the mat in your machine to start cutting. Wait for it to finish.
- Once done, unload the mat.
Step 5: Weed your Design
Now it is time to prepare your design by removing all of the excess and unwanted pieces of Infusible Ink.
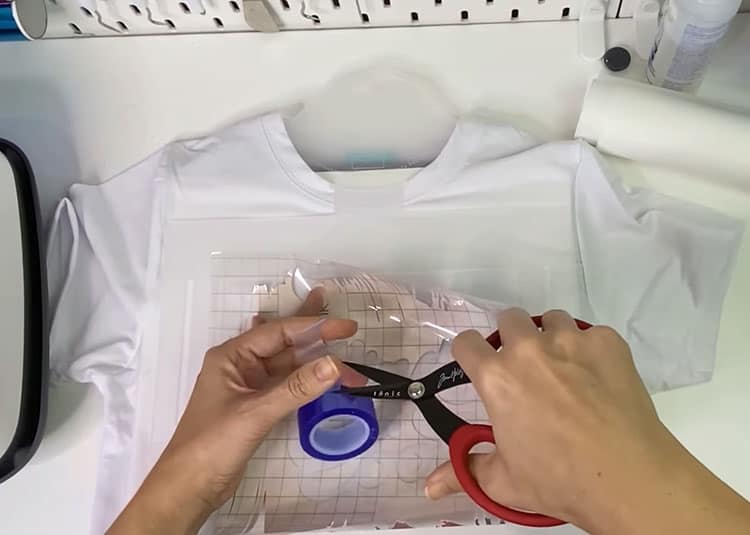
- To remove the Infusible Ink Transfer Sheet, flip over the green mat and pull the mat away from the sheet. This way you can avoid touching the front of the sheet.
- Trim down the excess sheet (so you can use it for other projects) using your scissors or rotary cutter, self-healing cutting mat and ruler (if you have it but you don’t need to buy it).
- Next, it is important to ‘crack' the sheet, roll it up, squeeze it until you can hear it crack and snap. This will help to make the weeding process much easier.
- Go around the edges and use your fingers to peel away all the excess that you don’t need.
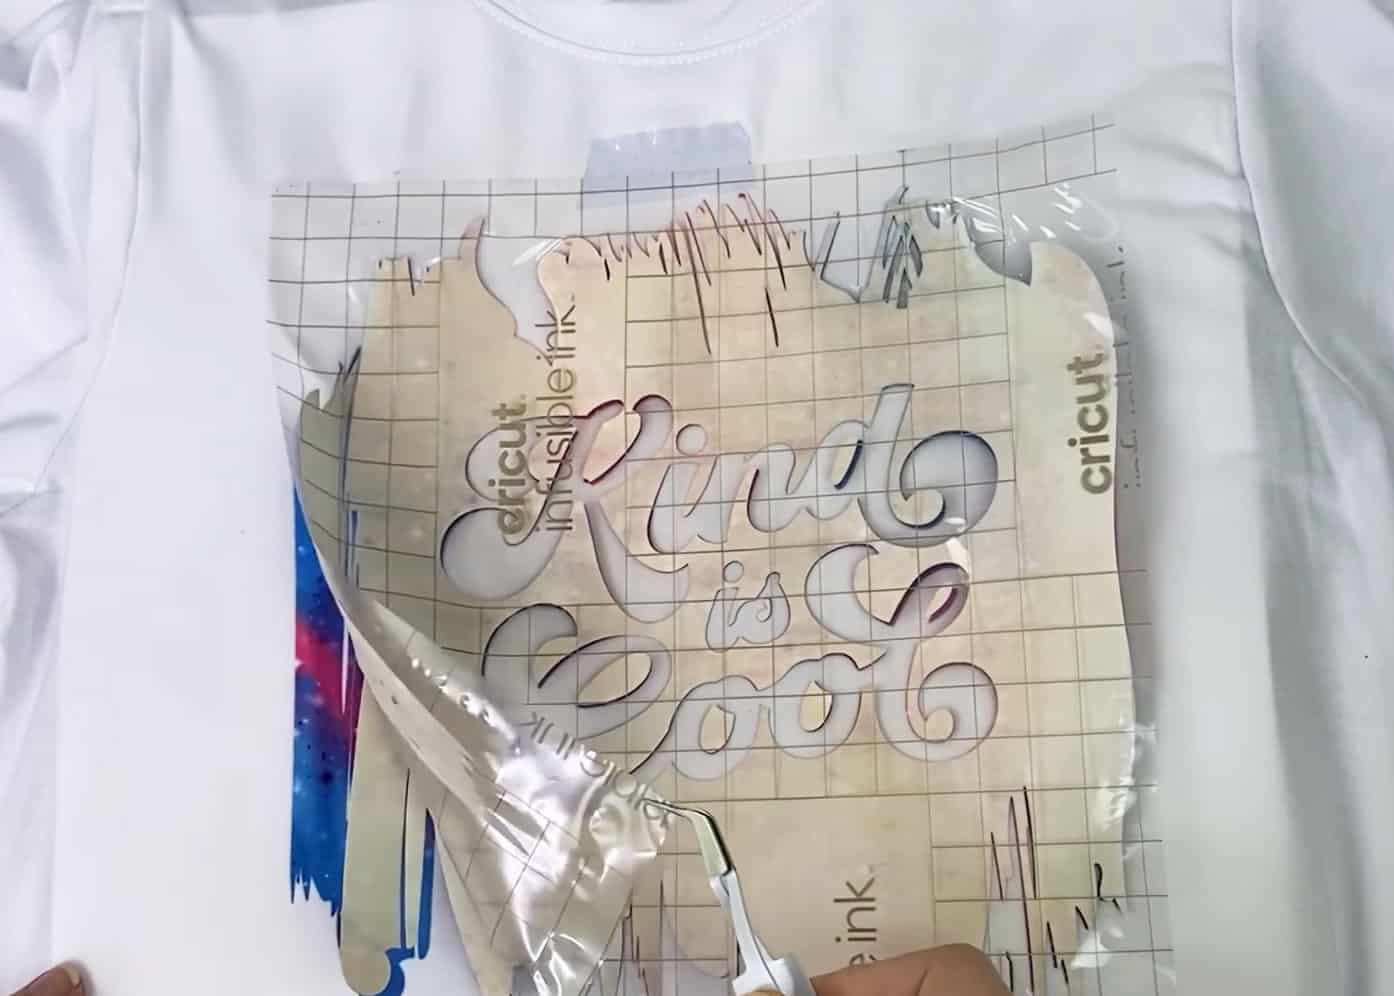
- Weed out the additional bits and pieces and the words “Kind is Cool” inside the paint smear. You can bend and squeeze the sheet again so you can see those little bits and pieces that need to be removed.
- It is now ready to put on your shirt!
Step 6: Preparing your Shirt Before Pressing your Design
It is finally time to apply this gorgeous design to a Polyester shirt!
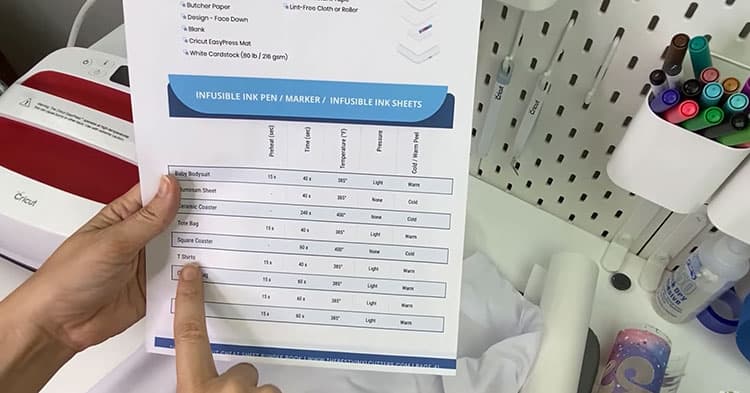
- Grab your cheat sheet (if you have the book – you can buy the book which has 80 cheat sheets in it here), and you will find the correct settings to use if you are applying the Infusible Ink with an EasyPress 2 (Pre-press for 15 seconds, then apply for 40 seconds at 385°F).
Tip: Use a lint roller too to remove excess threads and dirt off your shirt.
- First, you need to do a quick 15-sec pre-press. This will remove wrinkles and moisture.
- Next set the time (40 sec) and the temperature (385°F) on your EasyPress.
- Grab your Infusible Ink design, make sure that it is smaller than the plate of your EasyPress so you will have your whole design covered by the plate.
Important: Unless with vinyl, you shouldn't move the EasyPress when working with Infusible Ink. Movement can cause a ghosting effect on your design. So make sure your press is LARGER than your design.
Step 7: Time to Apply your Design to your Shirt!
Finally, we are ready to apply the design. Watch the magic, your design is going to come out super vibrant!
- Have another look at your cheat sheet to find the stacking order for your Infusible Ink application.
Here is the stacking order (1 is the top and 6 is the bottom):
- Cricut EasyPress 2
- Butcher Paper
- Design (facing down)
- Shirt
- White Cardstock (80lb / 216gsm) or 3 Sheets of Printer Paper
- Cricut EasyPress Mat
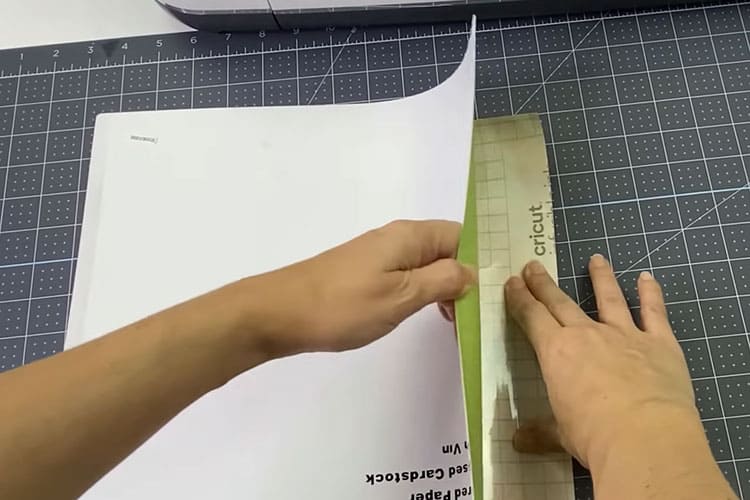
- First lay down your mat (whilst you can use a folded towel, you will not get the same result, so a mat is fairly important here). Next, place your cardstock or 3 sheets of printer paper over the EasyPress mat (this will protect the mat from the ink) and insert both the mat and the cardstock INTO your shirt.
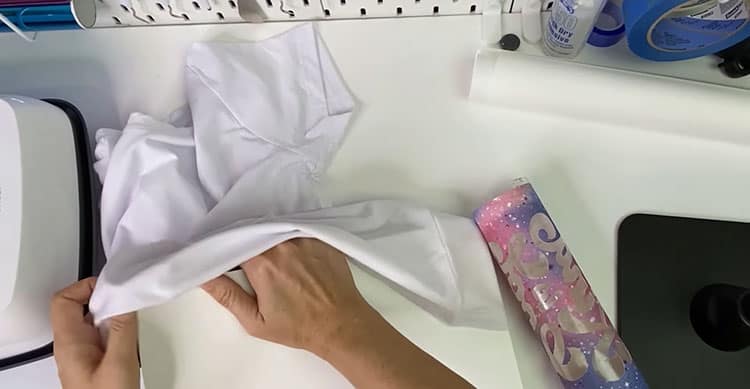
Tip: You need the cardstock to protect you EasyPress mat from the ink soaking through the shirt all the way to your mat.
- Use a t-shirt guide (if you have one) or alternatively fold the shirt in half to figure out the middle of the shirt.
Tip: You can also measure how many cm/inches below the neckline is recommended (cheat sheet for the measurement is also available on my Etsy shop.)
- Next, place the Infusible Ink sheet facing down on the shirt. Apply some heat tape to hold the Infusible Ink Transfer Sheet in place. You will see that the Infusible Ink is not sticky, unlike iron-on vinyl.
Tip: Do not use normal sticky tape because it will melt under heat. Use heat tape instead.
- Next place the butcher paper on top of the Infusible Ink. The butcher paper is needed to protect your EasyPress. You can find the butcher paper in your Infusible Ink box.
- Place your EasyPress on top of the butcher paper. Press the timer button which should be set to 40 sec. Hold your EasyPress still – don't be tempted to move it. You also don't need too much pressure, light pressure will do the trick.
Tip: If you are using an EasyPress Mini or iron, make sure that you are constantly moving your EasyPress Mini or iron around your design so it will even out the colors of the ink on your shirt/fabric. Don't stop moving it!
- Use tweezers to remove the transfer sheet as it is really hot right after pressing.
And you’re done! Now just let it sit for 24 hours before you wear or wash it 🙂
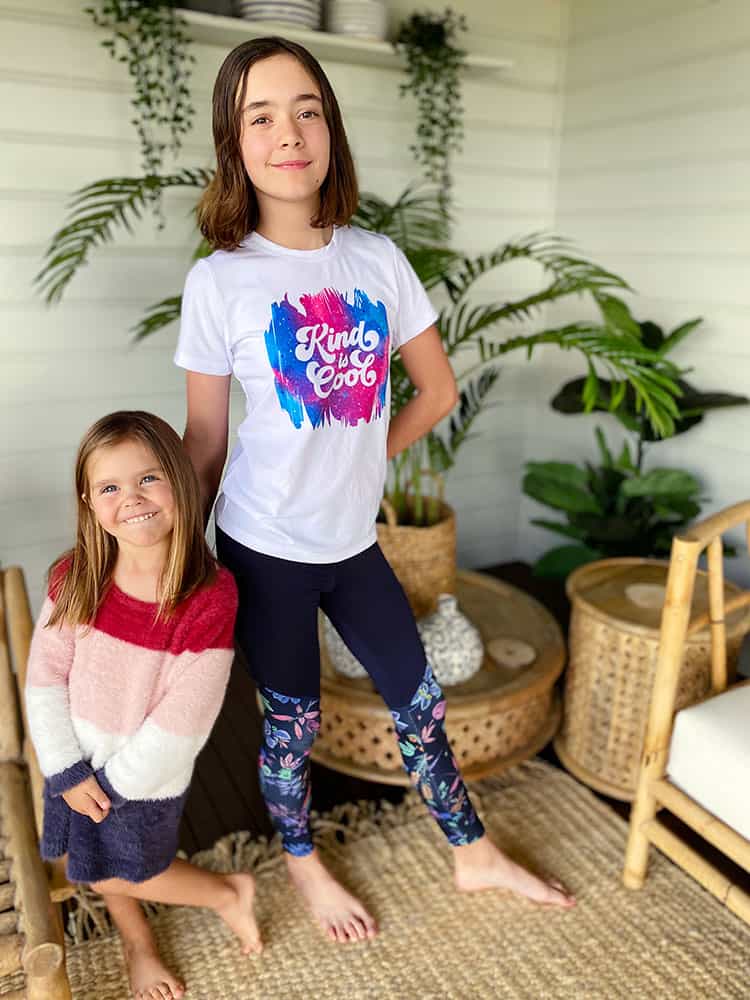
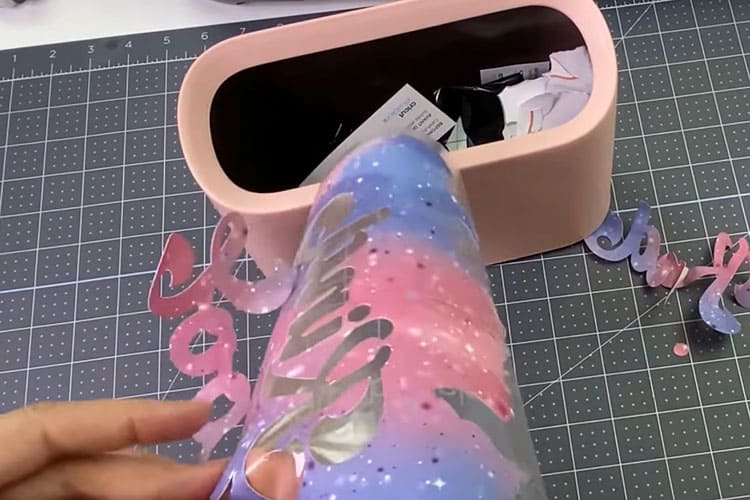
Here is the beautiful finished product.
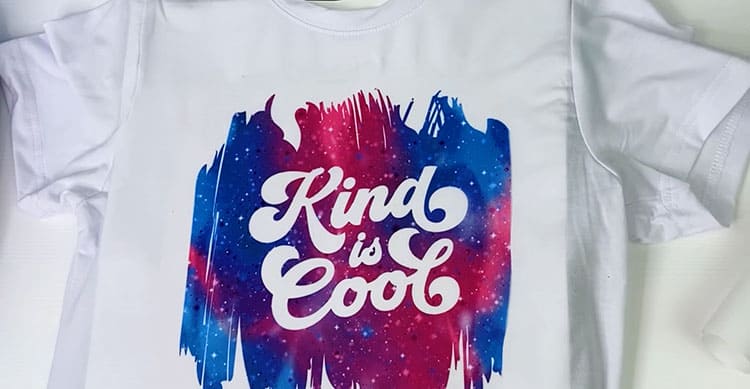
The ink is in the shirt and not on the shirt and it looks so bright, colorful, and professional!
Hope you will also enjoy making this project as I enjoyed creating this cool shirt!
If you want to know which are the best shirts for Infusible Ink have a look at our post all about Infusible Ink shirts! Not only do we look at Cricut Infusible Ink shirt blanks, but we also cover other Infusible Ink compatible shirts that you can use.
If you want to learn all there is to know about Infusible Ink, read our Beginners Guide to Cricut Infusible Ink to learn more!
Want some more HTV or infusible ink inspiration? Check out our blog post for some more Cricut t-shirt design ideas, or grab more ideas of what to pop on your Infusible Ink shirts here!