I'm not sure why, but I typically find Christmas layouts to be super tricky to make.
It might be because sometimes I don't like the Christmas scrapbook collections that are out, or maybe it is because I feel restricted to typical Christmas colors.
Either way, they always challenge me, but I'm pretty proud of this layout that I whipped up. So much so that I wanted to share the full tutorial for the Christmas layout with you all.
I hope you enjoy!
Xmas Lollipop: DIY Christmas Scrapbook Layout with Instructions
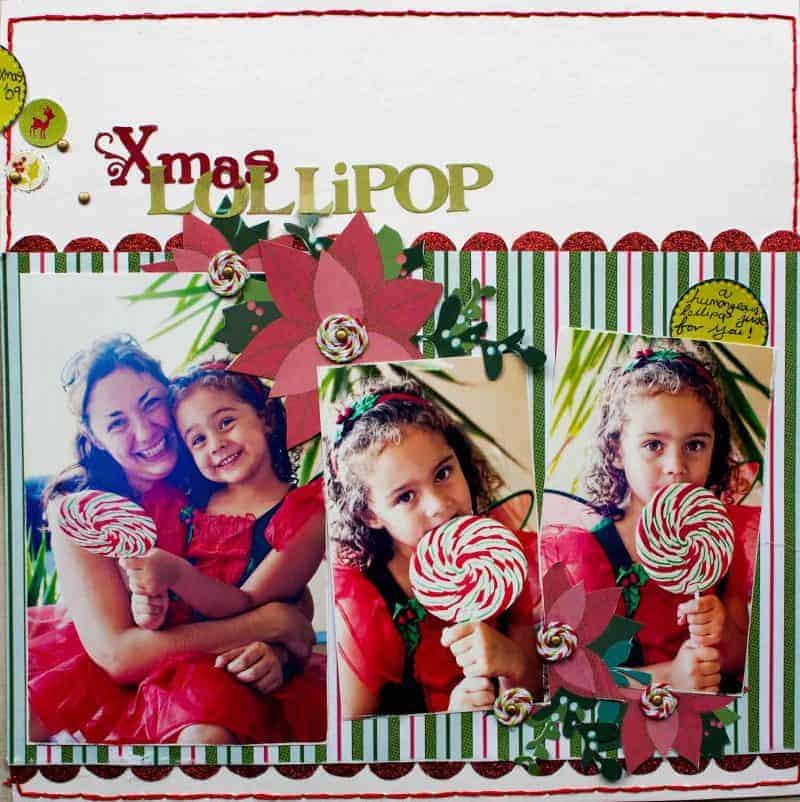
Find below the full tutorial on how to create your own Christmas layout. This layout is also featured in our round-up of festive Christmas scrapbook ideas that you can check out as well.
Supply List:
- White Bazzill Basics cardstock
- Christmas themed patterned paper ( 1 x stripey,1 x glitter polka dot, and 1 x flower)
- Journaling stickers
- Alphabet stickers
- Embroidery thread (in red)
- Bakers twine (in white, red and lime green)
- Brads
Step-by-Step Instructions:
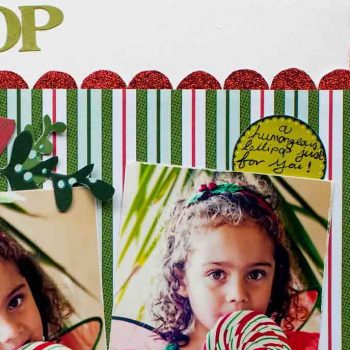
- Carefully cut out around 20 circles from a polka dot patterned paper – or use a circles punch or your die cutting machine to quickly cut these out for you.
- Cut each circle in half and set aside for the scalloped border.
- Trim a striped paper to 7.5 x 12″.
- Turn it upside down and apply liquid glue along one edge.
- Carefully stick down the half circles so that they touch – this will create a rough scalloped edge. Repeat this step along the top edge as well.
- Stick this layer to the layout around 1/2″ up from the bottom of a piece of white textured cardstock.
- Using a needle and red embroidery thread, stitch around the outside edges of the exposed white cardstock.
- Trim the photos to size and sand down the edges to expose the white core.
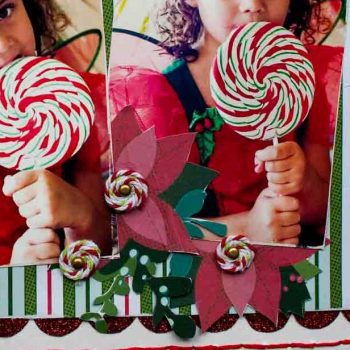
- Carefully cut out four poinsettia flowers from some patterned paper. Again you might like to use your electronic die cutting machine to create some custom flower die cuts for your layout.
- Play with the arrangement of photos and flowers until you are happy with the layout and then adhere them all into place.
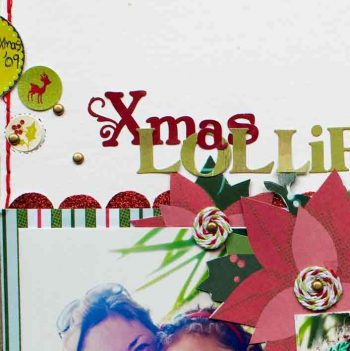
- Add the page title, we used different color stickers so that we could overlap the words.
- Write your page journaling onto a journaling sticker and place at the top right of the right-hand side photo.
- Jolene made the centers of the flowers to represent the Christmas lollipop. To do this, simply apply a circle of liquid glue to the center. Use three different colors of baker's twine, twist them and then twirl them onto the liquid glue onto the flower centers.
- Finish off your page by playing with the placement of some circle stickers and brads (to enhance the circle theme of the lollipop).
Close-Up Detail Shots
Here are some detailed shots for you to help you with your steps.
As a tip, you might have noticed that I played with the main feature of the photo: the lollipop. I used the repetition of round shapes on my layout to place more emphasis on the lollipop and also used the colors from it to create my own flower centers.
Try to be creative with your title as well – if you get stuck, we have a great post with some fabulous Christmas title ideas here.
 |  |  |
If you do happen to follow our instructions, or even if you feel inspired by some aspects of this layout, we would love for you to share a link to your creation in the comments below.
And if we don't see you on our blog before Christmas – Merry Christmas to you.