Looking for a beautiful unique gift to gift to a family member or friend?
An etched casserole dish is a perfect gift to gift for all sorts of occasions. From birthdays, to house warmings, to wedding gifts, to Christmas gifts, these etched pyres dishes are sure to impress!
Our glass etching tutorial below will help you create personalized etched casserole dishes! Ours might be Christmas-themed but you can easily pick a different saying to make it suit other occasions.
Best of all, you can replicate the project and create one for each home cook in your life.
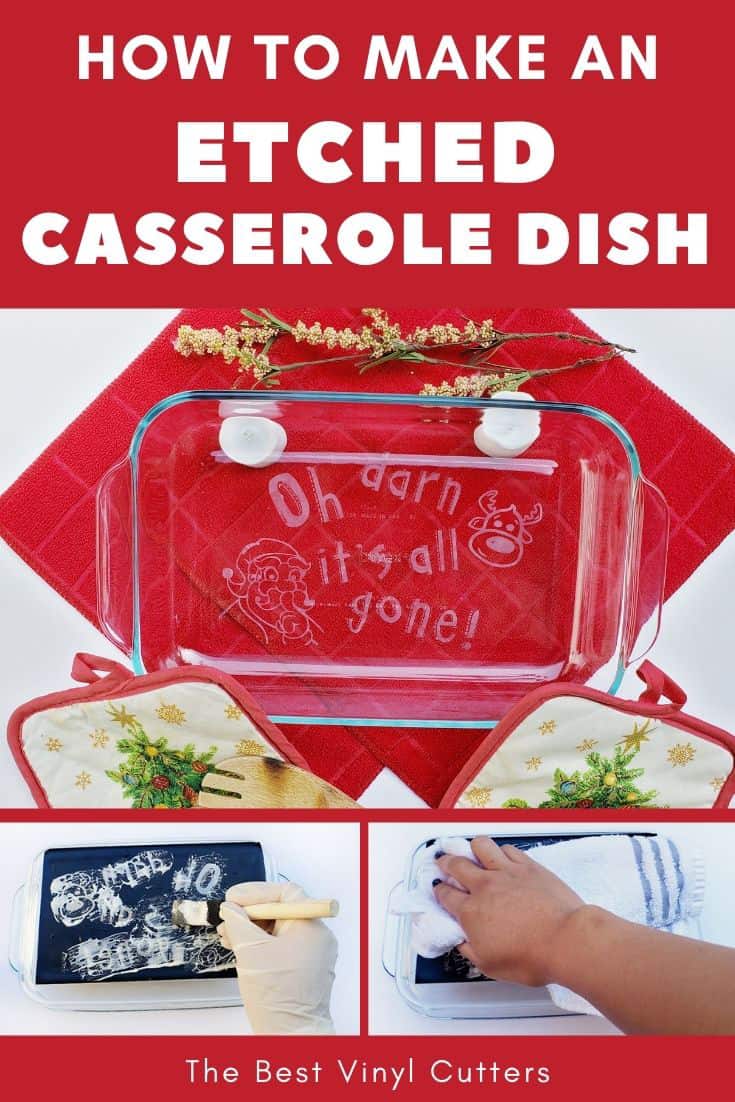
How to Make an Etched Casserole Dish
Find below the steps to follow in order to create this etched baking dish that you can gift for Christmas, a Housewarming, a Birthday (or for any occasion really).
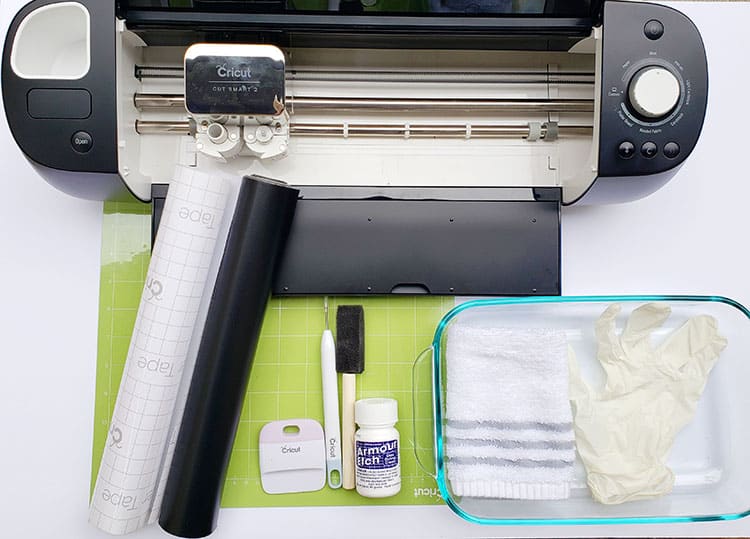
Supply List
- Cricut Cutting Machine (I'm using the Explore Air 2)
- StandardGrip Cutting Mat
- Stencil Vinyl ( I am using black Oracle 651 vinyl)
- Transfer paper
- Pyrex Casserole dish *
- Foam sponge with wooden handle or just normal brushes
- Gloves
- Hand Towel
- Armour Etch
- Weeding Tool
- Cricut Scraper
* Note on Dishes:
We are linking to the Pyrex Baking Dish that we used in this tutorial above. It is important to note that not all baking dishes will work with etching cream.
Make sure to check the info on your baking dish, if it mentions that the dish will not scratch very easily or that it is made of Borosilicate, then it will most likely not work very well with etching cream (which essentially has to roughen up the surface).
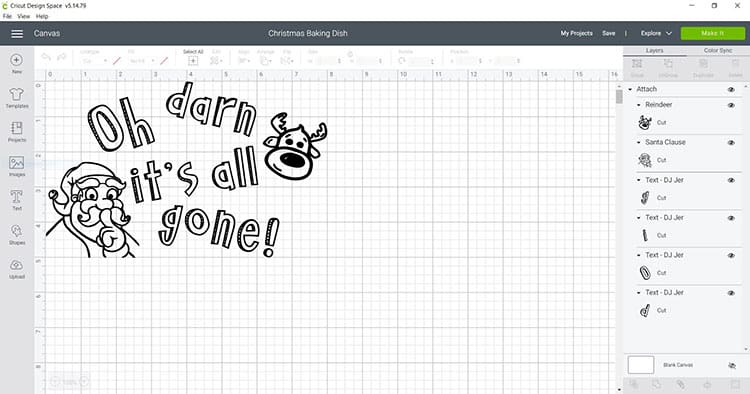
Step 1: Download and Upload your SVG to Cricut Design Space
Find below the step-by-step instructions on how to prepare your baking dish SVG for cutting. Ours will be Christmas-themed, but you can find whichever SVG you would like to use.
- Download the Christmas baking dish image (or if it is not Christmas any beautiful kitchen SVG will work).
- Upload your file to the Cricut space. If you use the FREE SVG file that we are providing as part of this tutorial, then you will end up with an image like this in Cricut Design Space.
Step 2: Size your SVG and Cut your Stencil
Next, it is time to size your design, remember that the edges of a pyrex dish are curved, so you can't make the design go from edge to edge.
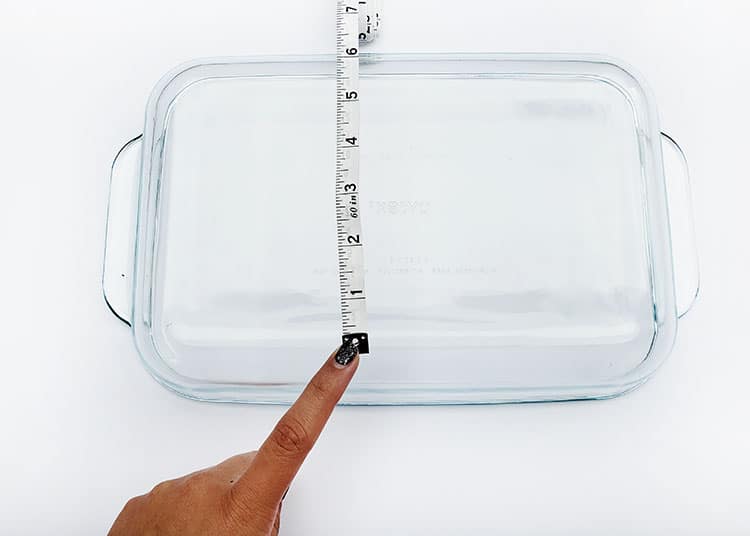
- Next, measure the size of your baking dish and resize your design to suit the size.
Tip: You will want to give 1-2 inches of wiggle room both in length and width. If your dish measures 10 inches in length, you will want to resize your design to 8 inches and if your width measures 6 inches you may want to resize as 5 inches.
- When you are happy click on “Make It”. You will now be able to pick your material and cut settings.
- Select “Mirror”. Normally when we work with adhesive vinyl, we don't need to use Mirror, but because this is a stencil, it is important to mirror your design so that your image will display correctly on the dish. Once you toggle on the mirror switch your design should appear backwards (as if you are holding it in front of a mirror).
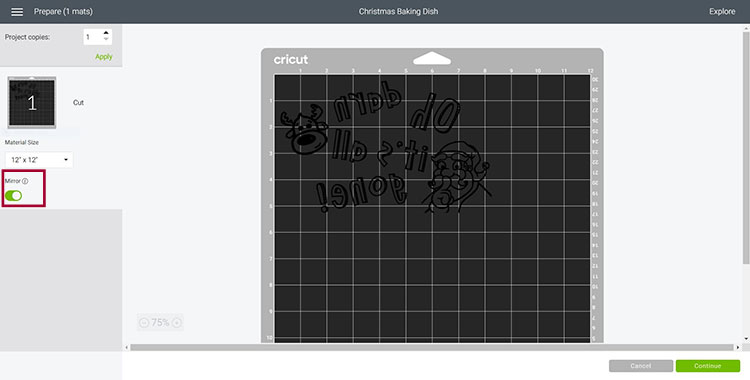
- Select “Vinyl” as the material to cut – if you are using proper stencil vinyl, make sure to select that instead.
- Place your vinyl/ stencil vinyl with the shiny side face up on your standard grip cutting mat.
- Load the mat into your cutting machine and cut the stencil from the vinyl.
Step 3: Weed your Design
Now it is time to create that stencil. I am using permanent vinyl even though we will only be applying it temporarily because I want to make sure I get a decent seal (otherwise the etched cream can get under the stencil).
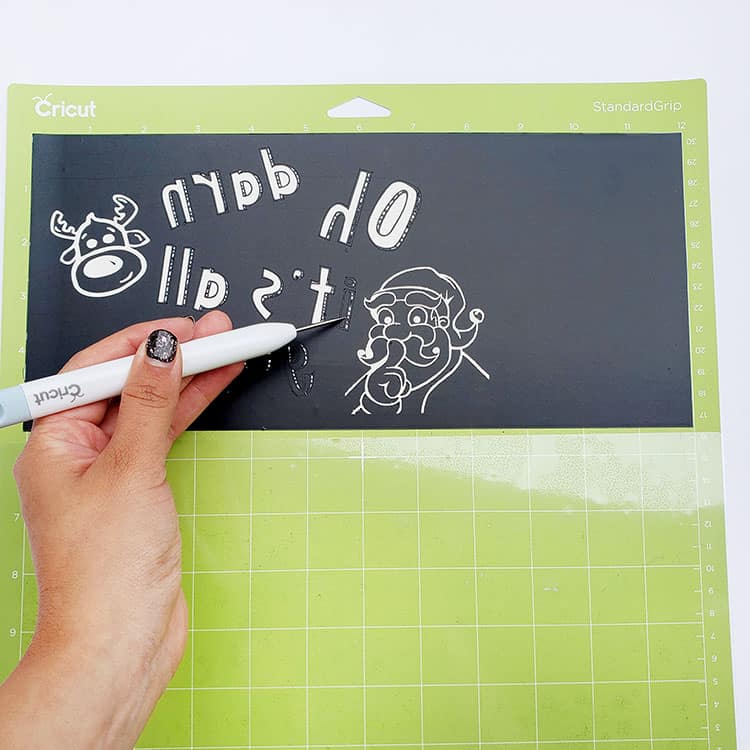
- Next, use your weeding tool to help you lift up the stencil pieces of your design. Go slowly around the letters and fine details. Don’t forget to weed out the inside pieces. Remember we are only picking out the inside bits, because we are creating a stencil.
Step 4: How to Transfer Vinyl to a Baking Dish
Once you have weeded out the Christmas design you will need to place the vinyl/stencil vinyl on the baking dish. We will be applying the etching cream to the OUTSIDE of the dish.
Etching Cream is a chemical so we don't want to use it on the inside where it might come into contact with food.
- Before we apply the stencil to the glass, please ensure that your baking dish is really clean and dry. I prefer to use rubbing alcohol to remove all the oil (from fingers). Remember that we are applying the design to the OUTSIDE of the dish.
- It is much easier to use transfer tape/paper to move your stencil over to the baking dish. Cut your transfer vinyl so that it is the same size or slightly larger than your stencil vinyl.
- Place the transfer tape on top of the vinyl and be sure not to have any bubbles or bumps.
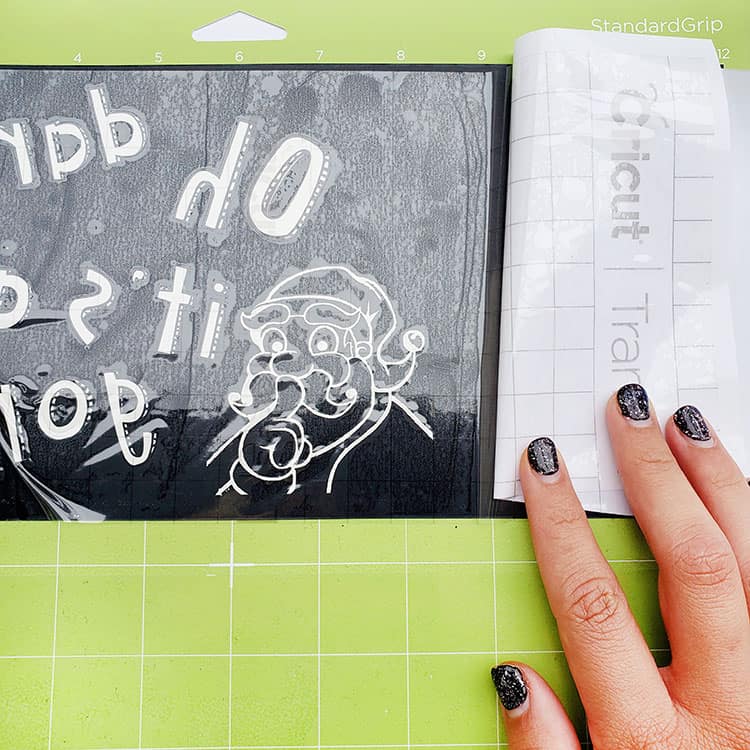
Tip: Use the scraper to get rid of any bubbles or imperfections
- Use your scraper to rub over both the front and the back of the stencil. We want the stencil to stick to the sticky transfer tape, so that it will lift up off the vinyl backing sheet.
- Slowly peel up the transfer tape and design from the top left-hand corner. Move slowly and try to work in a semi diagonal angle. If your stencil is not lifting up with the tape, place it back down and give it another good rub with the scraper.
- Place the stencil on the baking dish (on the outside), making sure there were no bubbles or bumps. Try to make sure that it is in the centre and that it is straight.
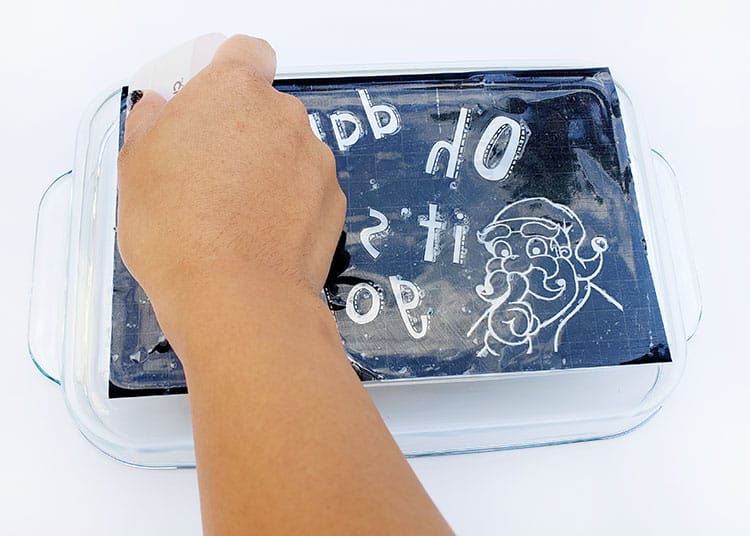
- Once again, use the scraper to rub over the stencil design. This time we want it to stick to the glass and to release from the transfer tape.
- Slowly peel back the transfer tape. Once again if your stencil lifts up, simply place the tape back down and rub over the problem area again. Place your transfer tape back on the backing paper (you can reuse transfer tape so don't throw it away).
Step 4: Brush the Etching Cream Over Your Stencil
Once the stencil is on the baking dish, you will need to add the etching cream. For your safety, you will need to wear gloves so as not to get the etching cream on your hands.
- Place gloves on both hands (some also prefer wearing an apron and safety glasses as well)
- Grab the Etching Cream and give it a shake or stir.
- Grab a brush and spread the etching cream over the stencil. You really don't have to use a lot of the cream, just make sure every part of the design is covered. It is also important not to go beyond the stencil. Now simply brush up and down and from side to side and in circles for around 5 minutes. This will help to really get the etching cream to start breaking down the glass.
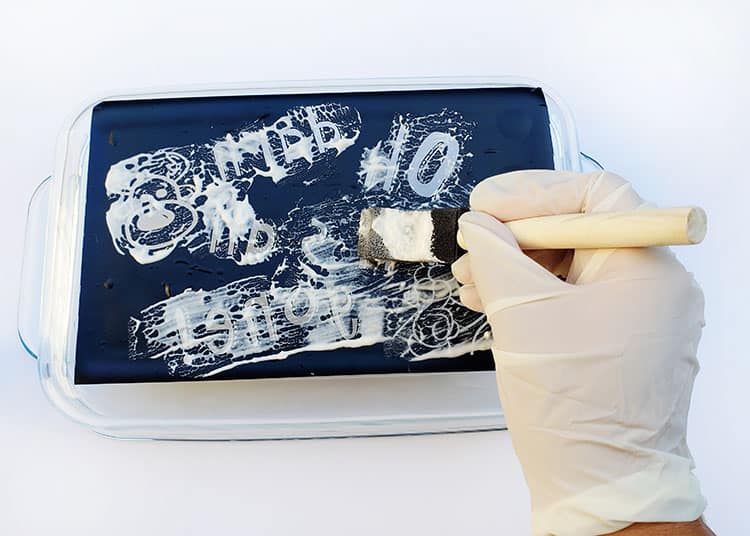
- If you accidentally get any etching cream on the outsides of the stencil, wipe it off straight away with a wet clean rag.
Step 5: Leave the Etching Cream to Sit for 5 Min, Then Wash and Dry
Now it is time for a cup of coffee, relax whilst the Etching Cream does its magic.
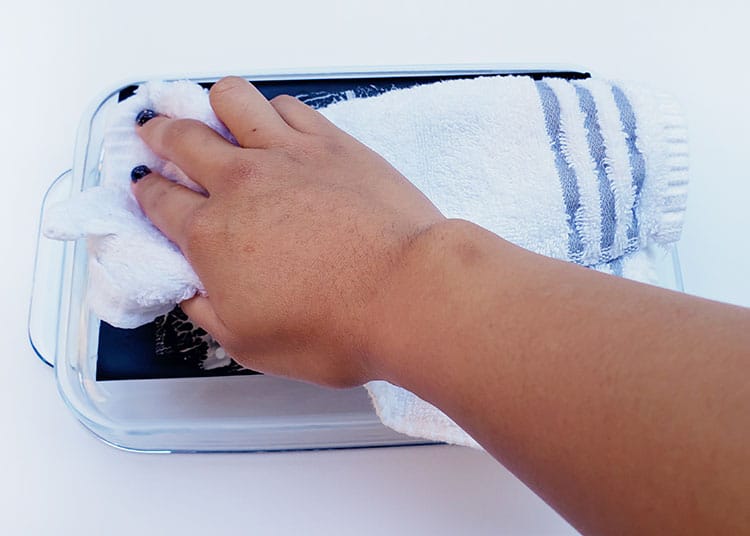
- Once satisfied, leave the etching cream for a minimum of 5 minutes, but no longer than 10 min.
- Wipe off the cream with a hand towel or paper towel and wash off any excess cream (with water).
Tip: If you used a lot of the cream, use your scraper to collect it and pop it back into your Etching Cream jar.
- Last you may remove the stencil (it might take a bit of effort because it is a permanent adhesive but it will come off!) and wash off the etched glass casserole dish.
- Lastly use the rubbing alcohol to clean the dish to remove any left over cream or glue residue from the vinyl.
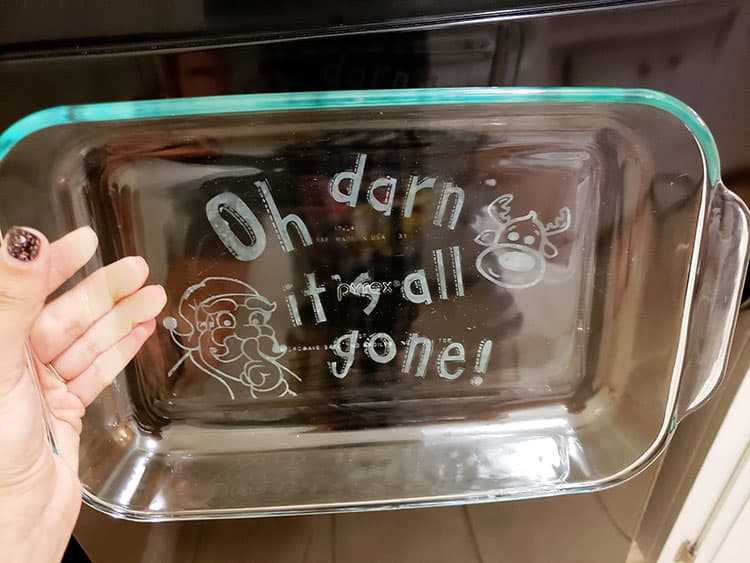
Viola! Your etched glass dish is finished! I hope you enjoyed creating your very own etched Christmas casserole baking dish.
You can see how easy it is to customize this design so that you can make etched casserole dishes to gift for various occasions such as birthdays, house warmings, and Mother's Day gifts.
Now that you are in the spirit of gifting, click to see our list of beautiful Cricut ideas for Christmas gifts.
If you fancy making more Cricut Christmas projects then check out our blog post for some ideas!
WANT TO REMEMBER THIS?
SAVE THE ETCHED GLASS TUTORIAL TO YOUR FAVORITE PINTEREST BOARD!
If you think that you would like to turn your Cricut hobby into a side hustle and would like further reading on this? Read our post that is full of Christmas Cricut craft ideas to sell for ideas and inspiration.
Is this svg available for purchase?
Hi Brenda, you can download it for free here: https://drive.google.com/file/d/1pROekvTPB-lsyF6Bek6QbezYrFHE0FaO/view?usp=sharing