Thinking of making a personalized gift for a friend or family member? Or maybe you are thinking of items to sell on Etsy? Well, look no further, today we will be showing you how to create DIY glitter tumblers.
These glitter tumbler cups are easy to create, and great gift items as it is an everyday item that most people use as they drink their favorite drink on the road.
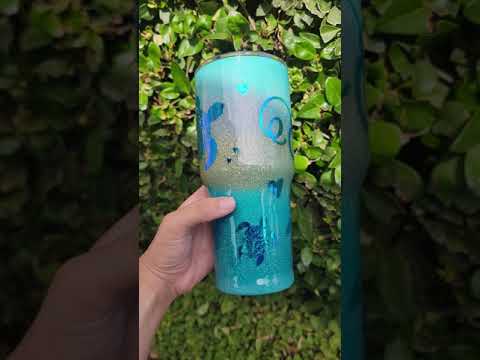
What is even better is that they can’t buy anything like this in the shop. I absolutely adore our ombre look that we created with glitter and you can really personalise it even further by adding a vinyl decal that suits their personality.
Here is our tutorial on how to make glitter tumblers.
How to Make Ombre Glitter Tumblers with Epoxy
Follow our step-by-step tutorial see how to make custom tumblers. At the end of our tutorial you will have created your own DIY glitter ombre tumbler.
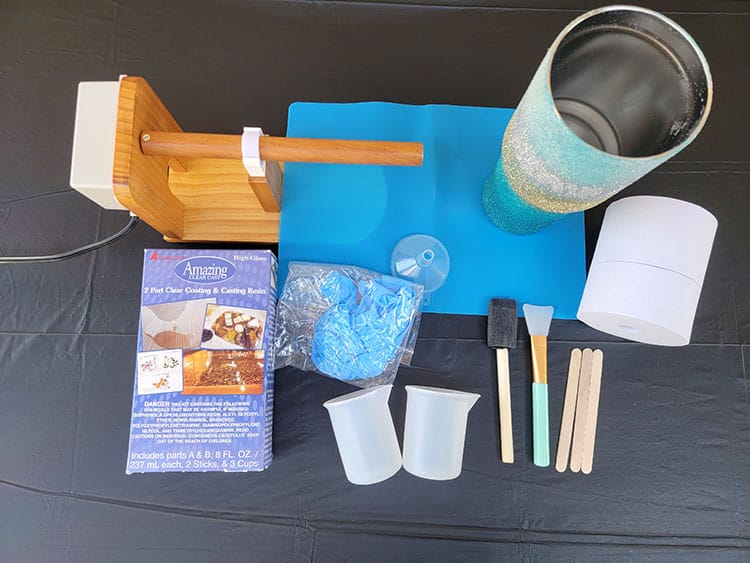
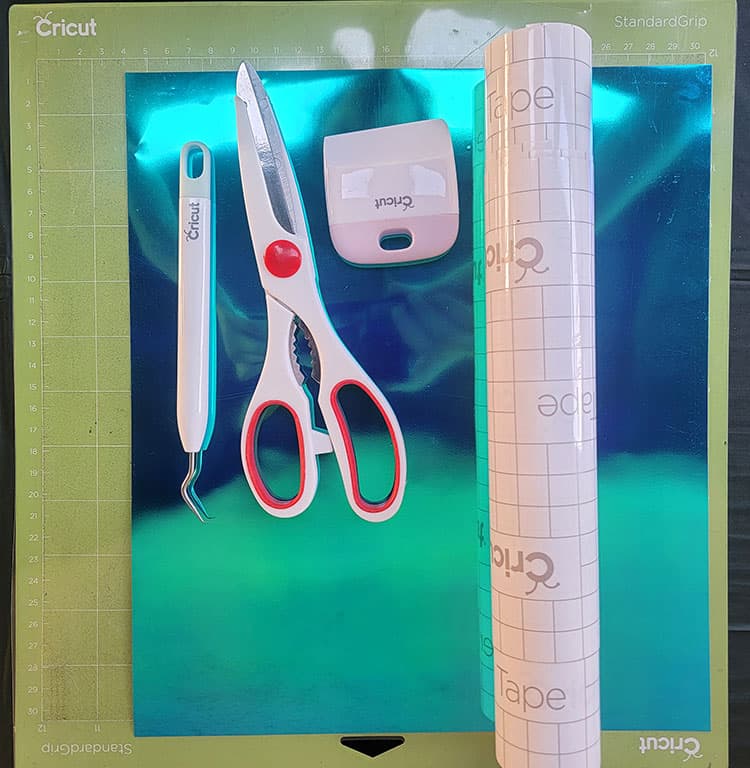
Supply List:
- Cricut Cutting Machine (I used the Cricut Explore Air 2 – see the review for the machine here)
- Tumbler Turner (We love this kit on Amazon if you are getting started)
- If you don’t get the kit above, you will also need: Gloves, Popsicle Sticks, Measuring Cups x2, Sanding Block, Silicone Brush, Silicone Mat (to protect your work surface), Painters Tape, Glitter
- Spray Paint to Match your Glitter (We used Aqua Spray Paint)
- Polycrylic Clear Semi-Gloss Spray
- Spray Adhesive
- 2 Part Clear Coating and Casting Resin
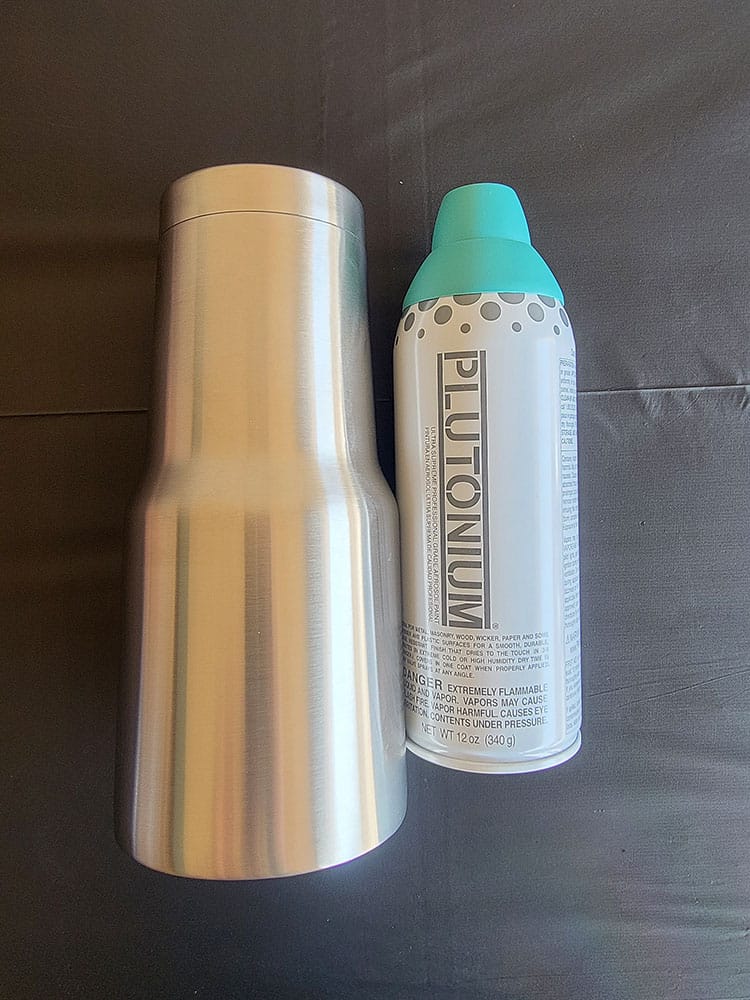
- Tumbler
- Transfer Tape
- StandardGrip Cutting Mat
- Permanent Adhesive Vinyl
- Cricut Scraper
- Cricut Weeder
- Scissors
- Painting Scraper
- Cardboard box
Step 1: Paint/Spray Paint the Tumbler
The first step in creating glitter tumbler cups is to paint or spray paint the base color onto the cup or tumbler.
As the plain tumbler is steel we want to change it by painting or spray painting the base to match the color of your glitter, or alternatively, you can also go with white for your base.
For this step, you will need: your tumbler, spray paint, gloves, and a cardboard box.
- We will be spray painting the entire tumbler, but depending on the type of tumbler you are working with you might wish to use the painters tape to line off sections. We will use the painters tape to line the inside of the tumbler (if you are using paint and not spray paint this is not that important).
- If you are using spray paint, set up your cardboard box now. (You could also do this outside if you don’t have a cardboard box). The cardboard box is being used as a protection so that the excess paint does not get on any items you do not want painted such as your garage floor or walls.
- Place your tumbler face down inside your cardboard box.
- Put on some gloves, the gloves will help you avoid getting spray paint on your hands.
- Begin spraying the first layer of paint.
Note: When spraying, spray at an angle and short bursts. Take your time and rotate the tumbler as you spray.
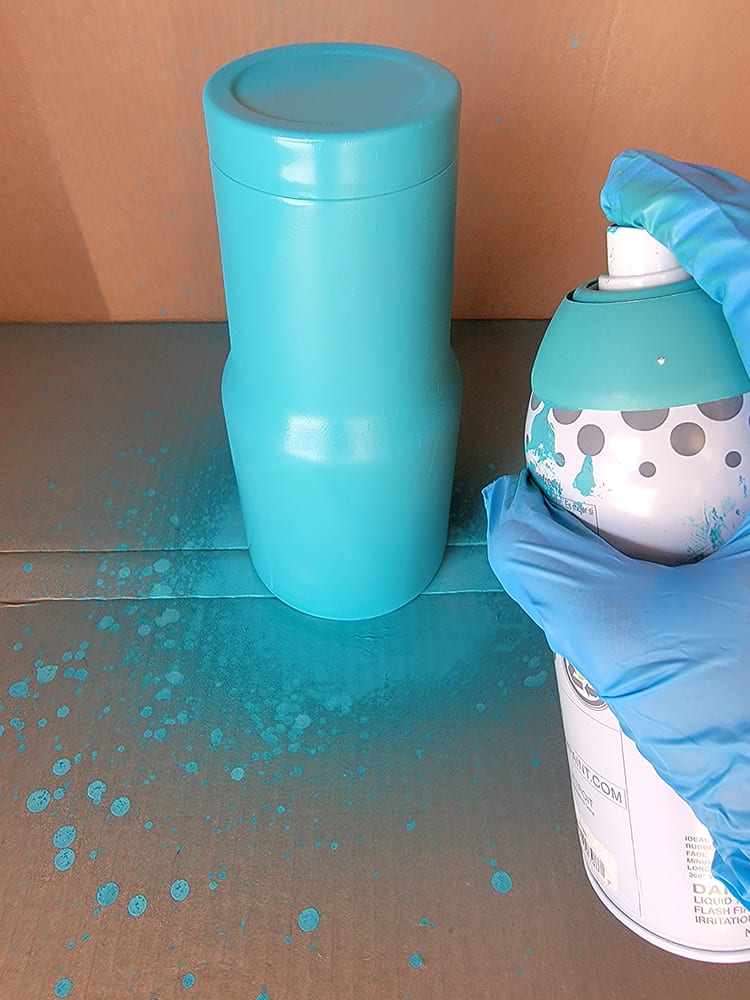
- Repeat the last step one more time as it is best to have two layers of paint. Now let the paint dry for at least 30 minutes.
Step 2: Adding Glitter to the Tumbler
Once your base coat has dried, you are ready for the fun part, adding your favorite glitter to the tumbler. For this it is best to have a table outside, in a well-ventilated area as you will be spraying on adhesive and quickly adding glitter.
For this step you will need: your tumbler, gloves, spray adhesive and glitter.
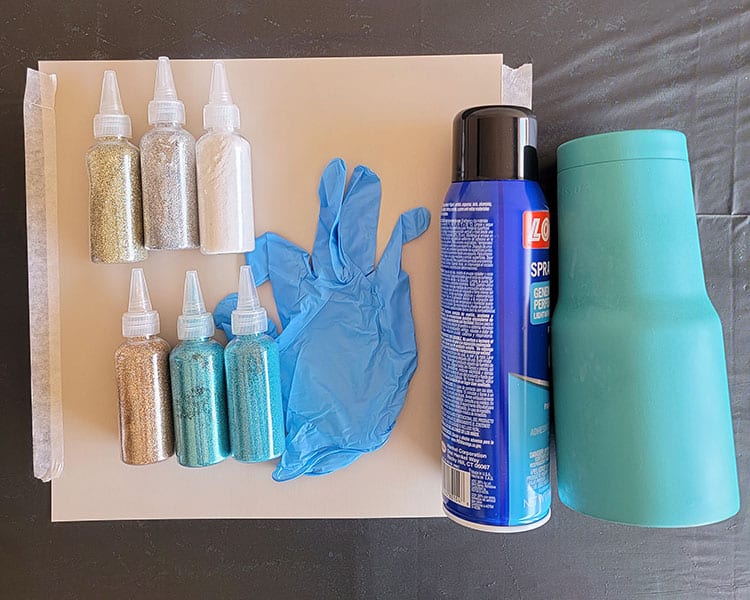
- Pop on the gloves, this again will help from getting the adhesive on your hands.
Note: For this tumbler we wanted to create the ombre effect, therefore we sprayed and sprinkled each section piece by piece.
- Begin by spraying the bottom portion of the tumbler with some adhesive spray.
- Almost immediately, begin adding the darker shade of blue glitter to the bottom section and rotate the tumbler to make sure you get glitter all around the bottom.
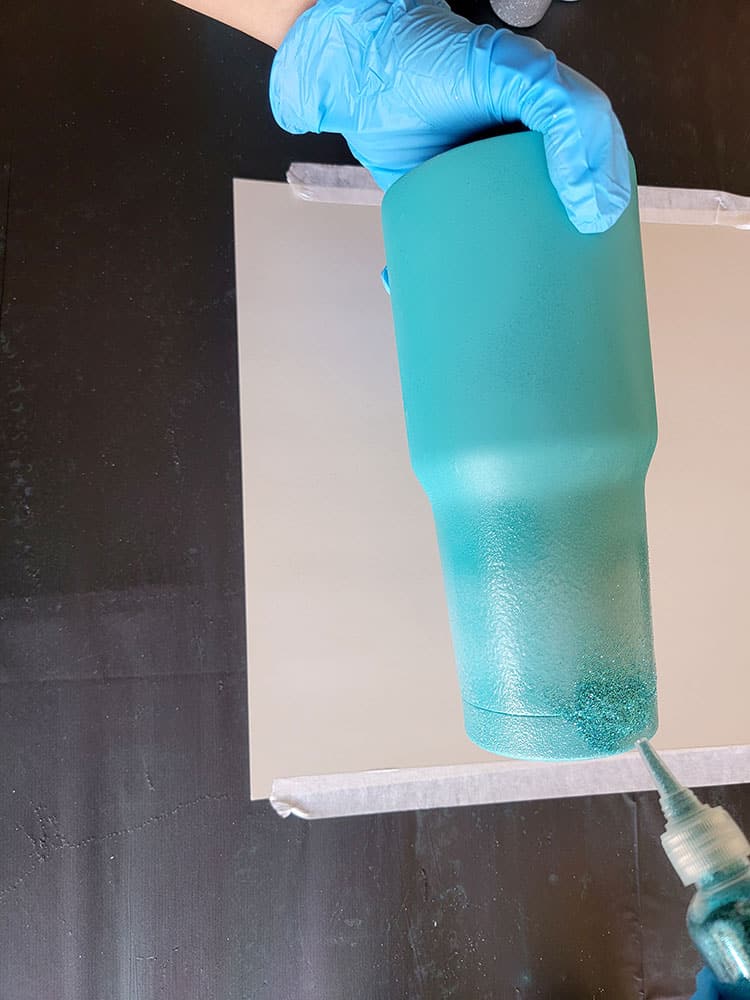
- From there repeat steps 2-3 for each of the color glitters to create the ombre effect (light blue, gold, silver, white).
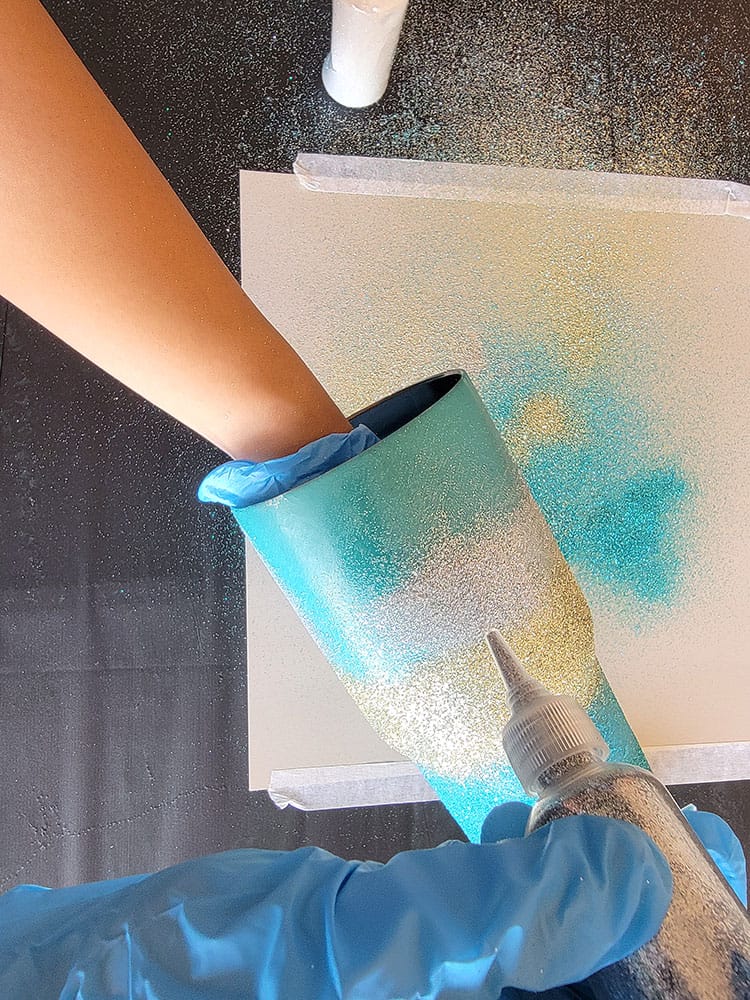
Note: When spraying each section, make sure to spray at an angle and do not leave any spray air bubbles (pop these with a small pin if they do appear). You may also need to add more glitter to the sections to cover the paint and tumbler.
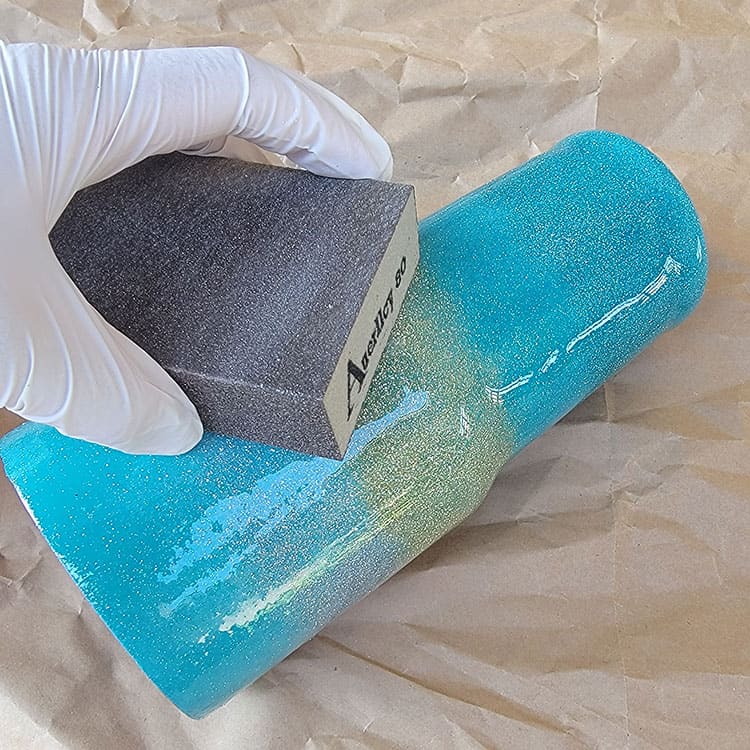
Step 3: Sealing your Glitter Tumbler Cup
Now that you are happy with the amount of glitter on your tumbler you will need to seal the tumbler. By this we mean you will need to add a gloss to the top of the glitter so that when you add the resin the glitter does not move around and ruin the ombre effect.
Supplies you need for this layer include: Glitter Tumbler, Sealant Spray, Gloves and your cardboard box.
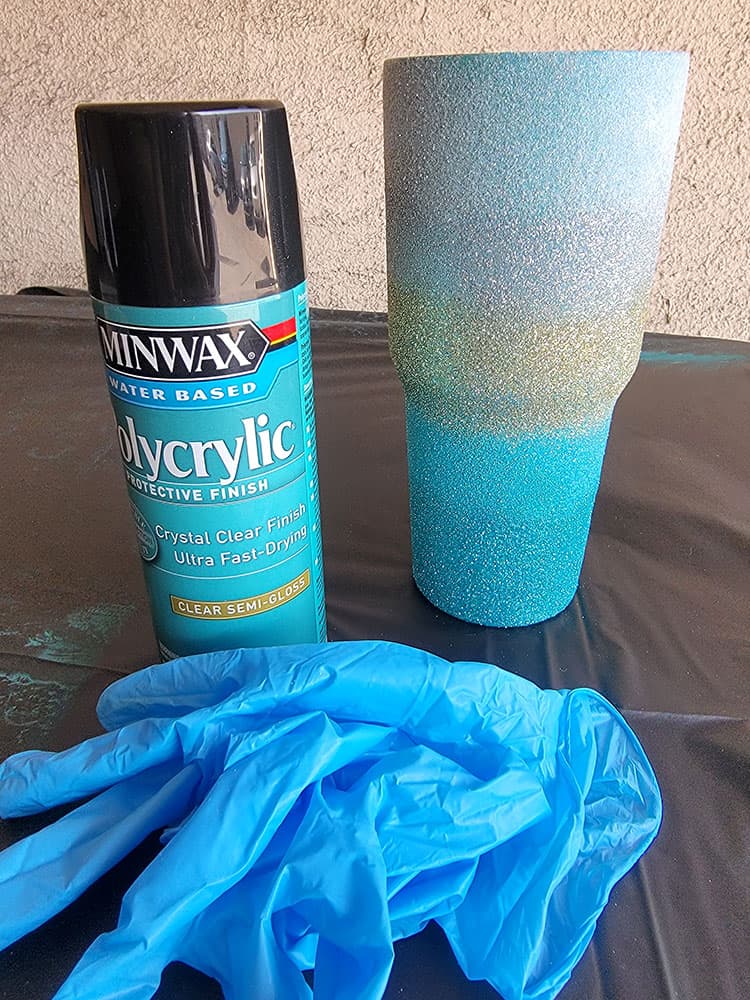
- Pop on gloves. Move the tumbler to your cardboard box to prevent unwanted spray in unwanted areas.
- Spray the outside of your tumbler, rotate it to ensure the entire tumbler is coated. Make sure to give it at least two coats.
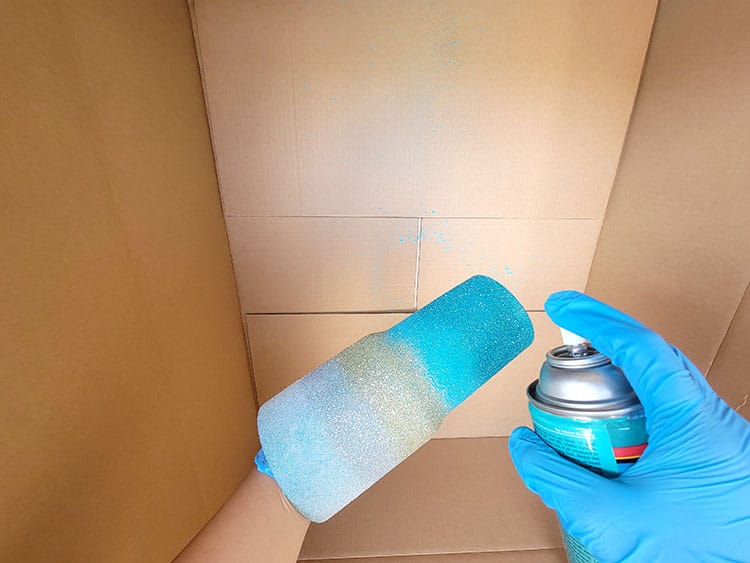
- Let the tumbler dry for at least 30 minutes.
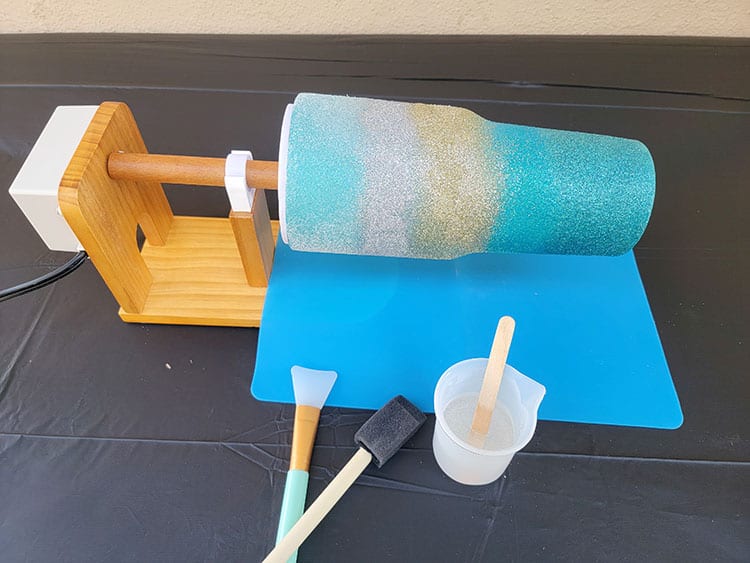
Step 4: Popping the Tumbler on Turner
Almost there! Now it is time for the fun and messy part of the DIY epoxy tumbler project, you will be adding the first coat of resin. For this you will want to be on a table in a well-ventilated area with an outlet nearby.
Supplies needed for this step: Sealed Glitter Tumbler, Tumbler Turner, Silicone Mat, Turner Adapter, Brushes, Popsicle Sticks, Epoxy, Measuring Cups, Gloves
- Assemble your tumbler turner.
- Place the tumbler adapter into the tumbler and turn on your tumbler turner to ensure the tumbler does not roll off. Once you have confirmed it does not roll off, keep it turned on, having the tumbler slowly turn.
- Place gloves on, this is for safety reasons, as you do not want the resin to get on your skin.
Step 5: How to Make Epoxy Resin
Now let’s mix up our Epoxy so that it is ready to apply to our spinning tumbler.
Supplies needed for this step: Epoxy Part A and Part B, 2 x Small Measuring Cups, 1 x Larger Measuring Cup, Popsicle Stick
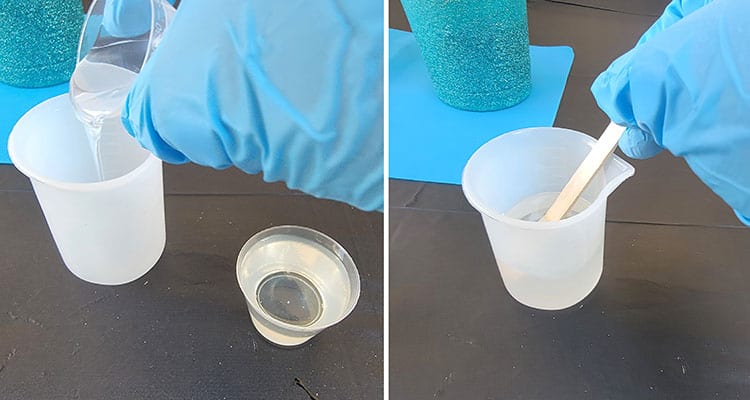
- Pour 25 ML of Part A and Part B into two separate measuring cups. Make sure both have equal amounts.
- Pour Part A into the large mixing cup and then add Part B to that same mixing cup, grab your popsicle stick and begin stirring for at least 3 minutes or until you get rid of the unwanted bubbles.
Step 6: How to Use Epoxy
Your tumbler should be spinning at this point. You have got the epoxy mixture ready so it is time to apply it.
Supplies needed for this step: Tumbler Spinning on Turner, Epoxy Mixture, Silicone Brush
- Your tumbler should be turning, slowly begin to pour small amounts of the liquid on top of the tumbler while evenly spreading it with your finger up and down.
- Repeat the previous step till you have used all the resin.
- Use the spreading brush to evenly distribute the resin further.
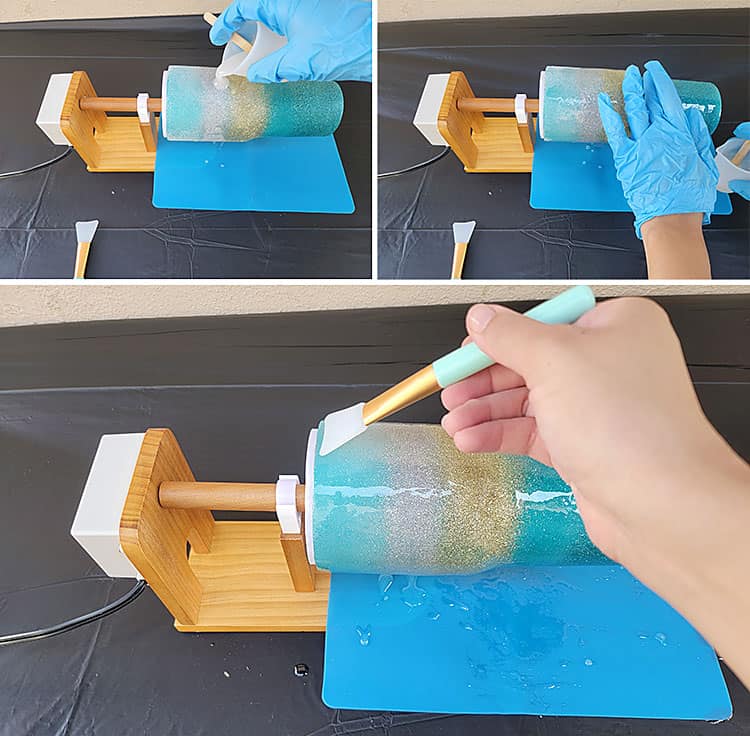
- Now let the resin cure for at least 8 hours (but it is best to leave it for at least 12-24 hours) to ensure the resin is no longer sticky/wet.
Step 7: Prepare Design in Cricut Design Space
Once your tumbler has dried and hardened, you will now be able to customize your tumbler even more with some vinyl Cricut cutouts. For our tumbler, we obtained a few turtle designs from the Cricut access library and added a text with the name of a family member.
- Begin by uploading the turtle files by clicking on this link.
Note: The designs are obtained through the Cricut Assess profile
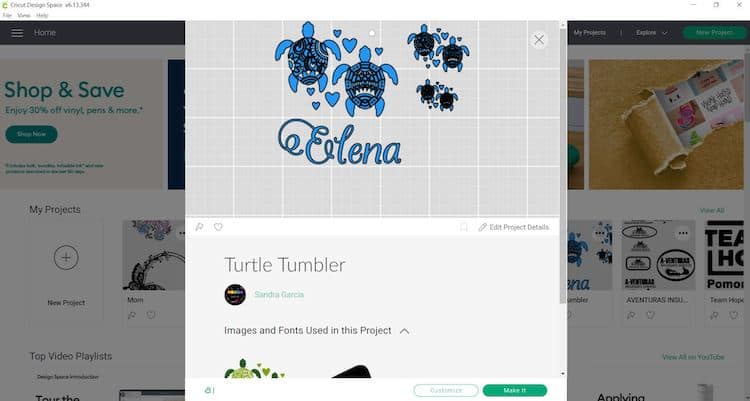
- Select “Open” and then select “Open Cricut Design Space Application.” From there you can select “Edit a Copy” and then you can change the name.
Note: Select “Edit a Copy” if you want to change the color and size. The design is sized for a normal tumble size; however, you can make the designs bigger than the 3-inch dimensions.
- Once you are satisfied with the design the next step is to send your design for cutting.
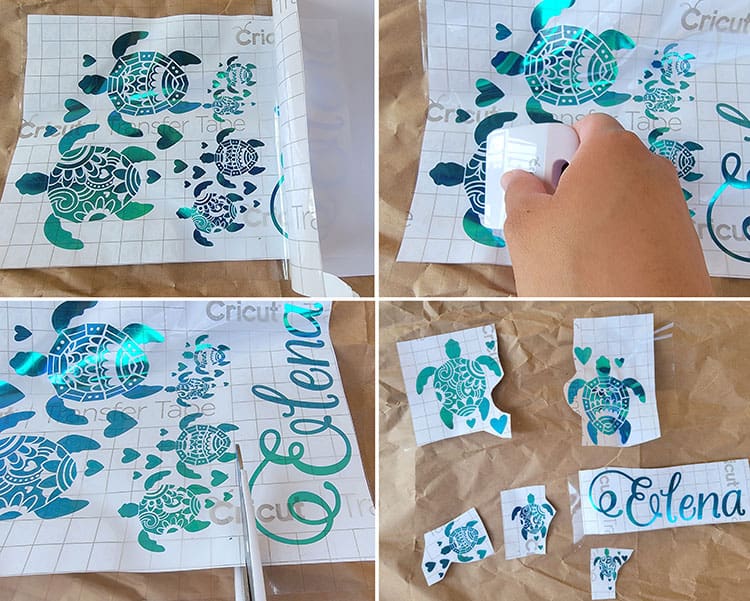
Step 8: Cut & Weed Your Vinyl Decal
Now that the design has been selected it is time to cut!
Supplies needed for this step: Your Cutting Machine, Permanent Adhesive Vinyl, Green StandardGrip Mat (for Cricut), Transfer Tape, Weeding Tools, Scissors, Scraper
- Place the permanent adhesive vinyl, shiny side up, on your green StandardGrip mat.
- When you are happy with the size and color of your design click on “Make It”.
- Select continue and connect your Cricut machine. You will now be able to pick your material and cut settings. If you have an Explore Air 2 – Select “Vinyl” on your material dial.
- Load the mat into your cutting machine and follow the instructions to cut the vinyl sheet.
- Next, use your weeding tool to help you lift the unneeded pieces of your design. Go slowly around the letters and fine details. Don’t forget to weed out the inside pieces.
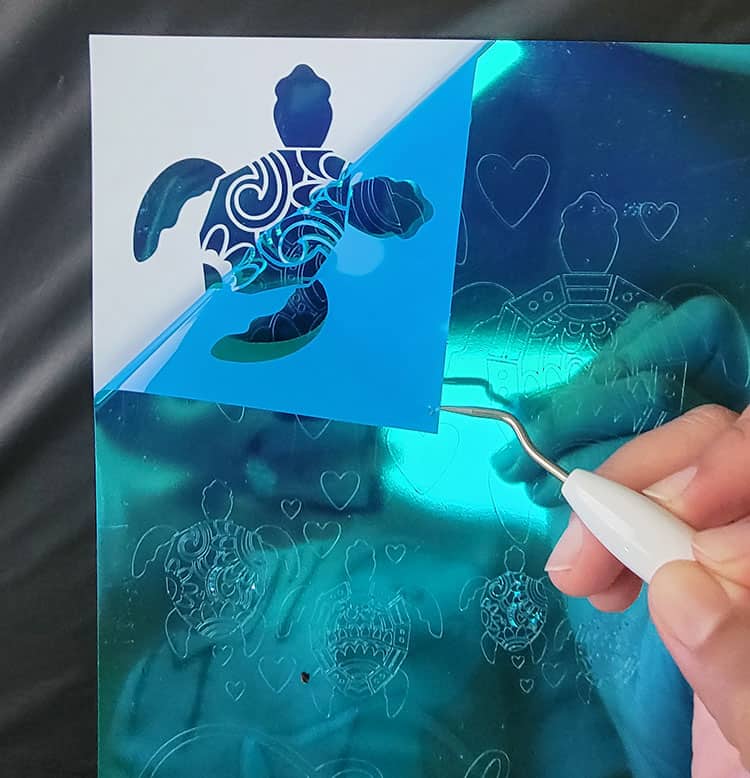
Note: You should be able to do your weeding with your fingers but use a weeding tool for smaller detail if required.
Step 9: Transfer Adhesive Vinyl Decal to Tumbler
Before we apply the adhesive vinyl to the tumbler, please ensure that the tumbler is dry and clean.
Tip: You may also want to make sure the tumbler has no bumps due to the glitter. If it does, sand down the parts, then wash the tumbler once more.
- It is much easier to use transfer tape to move your design over to the tumbler. Cut your transfer tape so that it is the same size or slightly larger than your decal.
- Place the transfer tape on top of the vinyl and be sure not to have any bubbles or bumps.
- Use your scraper to rub over both the front and the back of the design. We want the image to stick to the sticky transfer tape, so that it will lift off the vinyl backing sheet.
- Slowly peel the transfer tape and design from the top left-hand corner. Move slowly and try to work in a semi diagonal angle. If your decal is not lifting with the tape, place it back down and give it another good rub with the scraper.
- Place the design on the tumbler, making sure there are no bubbles or bumps. Try to make sure that it is in the center and that it is straight. For this design we cut each design individually and put them on one by one.
- Once again, use the scraper to rub over the design. This time we want it to stick to the tumbler and to release from the transfer tape.
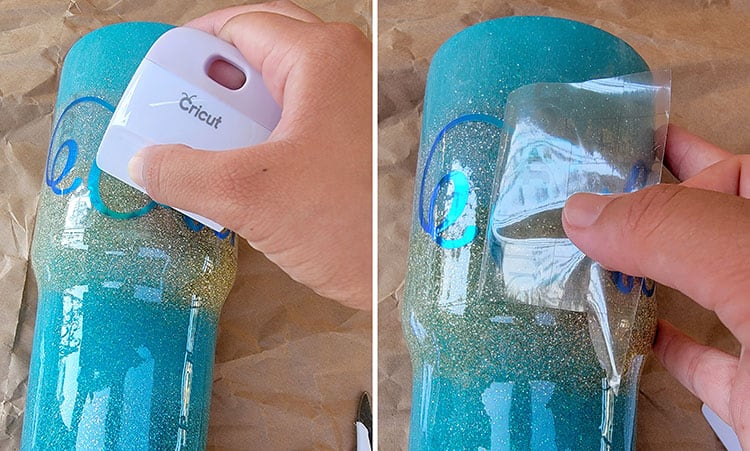
- Slowly peel back the transfer tape. Once again if your decal lifts, simply place the transfer tape back down and rub over the problem area again. Once you have removed the transfer tape, place it back on the backing paper (you can reuse transfer tape so don't throw it away).
Step 10: Adding Second Layer of Resin
Finally, you have the option of leaving the tumbler as is or adding the second layer of resin. For this project, we added the second layer to ensure the vinyl would last and so that the tumbler has a nice even finish.
- Pop the tumbler on the turner again.
- Make another mixture of Epoxy (see instructions above for the steps).
- Apply the mixture to the tumbler (see instructions above for the steps).

At last, you are done creating your personalized glitter tumbler, the best part is you can create it for any occasion and with any design! You can do this ombre effect or add stripes and more.
Tumbler Care Instructions
Now that you have learned how to create your very own diy tumbler, it is important to understand how to look after this tumbler. If you are selling these, it is also important to include a little card that includes the tumbler care instructions.
Here are some care instructions for your epoxy glitter tumbler:
- Hand-wash only
- Do not soak in water
- Do not place in the dishwasher for washing
- Do not leave in sunlight or direct heat
- Be careful not to drop the epoxy tumbler as it may crack
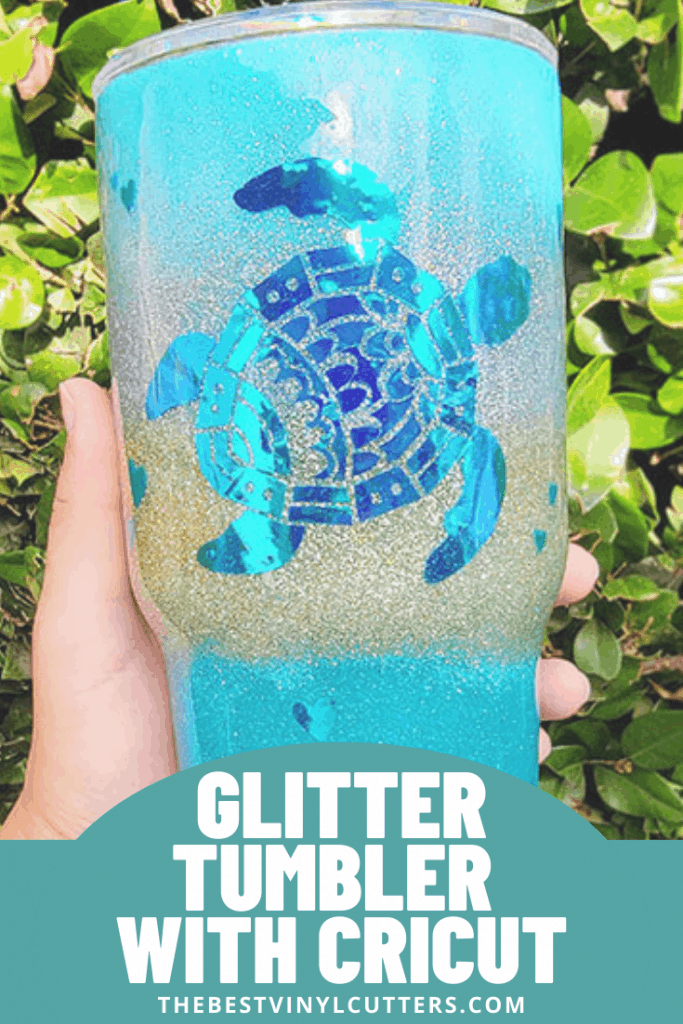
I hope you enjoyed our tutorial on how to make a glitter tumbler. Although the process is long, in the end you will have a unique and long lasting tumbler that is perfect for your every day cuppa or drink!
Let me know if you make an epoxy glitter tumbler and if you customised it using your Cricut and some adhesive vinyl!