So you have bought yourself some Cricut Infusible Ink Sheets and mug blanks but now you are not sure what to do next!
In this tutorial we will show you how to create beautiful mugs using your Cricut machine, Cricut Infusible Transfer Sheets, and a Cricut Mug Press (if you don't have one yet, I recommend you grab a Cricut Mug Press bundle so you can get started quickly and easily).
It is so quick and easy and once you know how to create Cricut Infusible Ink mugs you will love making custom mugs using Infusible Ink. I know I do!
Want to know more about Cricut Infusible Ink? Read our two guides below to get all the answers you need about this awesome product!
We will be using a Cricut Mug Press in this tutorial, however, if you do not have a Cricut Mug Press you can use any mug press that you may already have available.
How to Make Cricut Infusible Ink Mugs with Infusible Ink Sheets
Here is our tutorial on how to make Cricut Infusible Ink Mugs using Cricut Infusible Ink Transfer Sheets, a Cricut Mug Press, and Cricut Mug Blanks.
Supplies Needed:
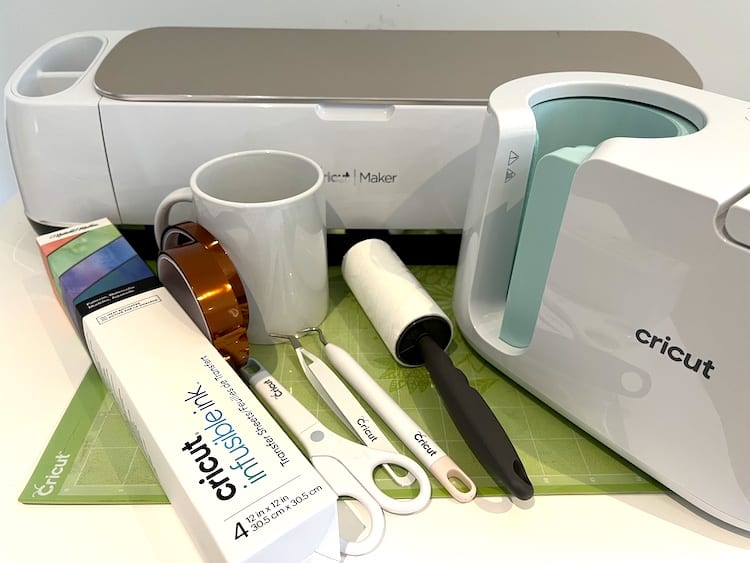
- Cricut Cutting Machine (I used a Cricut Maker)
- Cricut StandardGrip Cutting Mat
- Cricut Mug Press (You can also use a mug press like any of these)
- Cricut Ceramic Mug Blank or other compatible Cricut Infusible Ink mug blanks
- Cricut Infusible Transfer Sheets
- Butcher Paper (comes in the box with your transfer sheets)
- Heat Resistant Tape
- Lint Roller
- Scissors, Tweezers & Weeding Pick (you can also get all these tools in the Cricut Basic Tool Set)
Step 1: Create Your Design
Below you will find the step-by-step instructions on how to prepare your Cricut Mug design.
We have provided the link to the Cricut Design Space project however you can of course choose to use a different design or even upload designs you purchased.
If you wish to use our project you can do so by starting your project by clicking on this link. Choose either “Customize” to change the design or “Make It” if no changes will be made.
Note: The designs are obtained through the Cricut Assess profile.
Below are the steps we used to create this design.
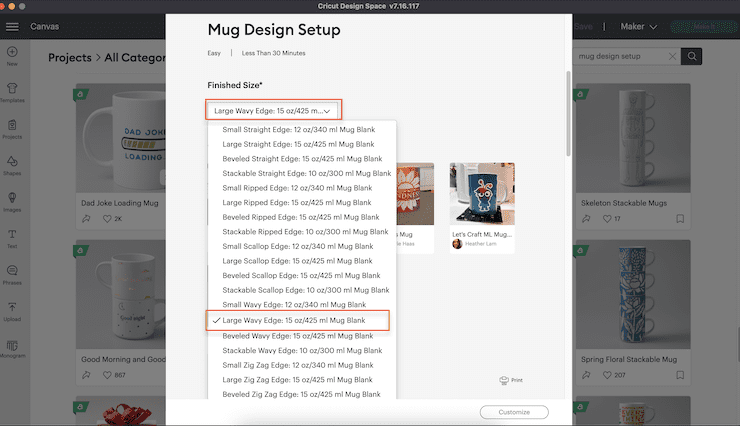
- Open Design Space and click “New Project”
- Once in a new blank canvas click on “Projects”
- Search “Mug Design Setup”
- Scroll and find the project named “Mug Design Set-up”
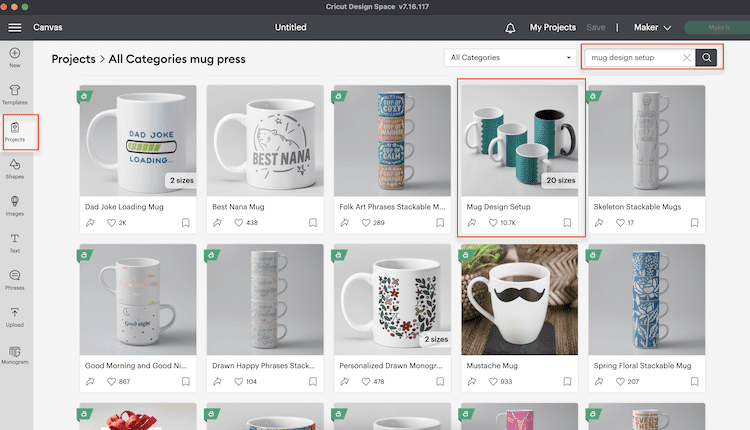
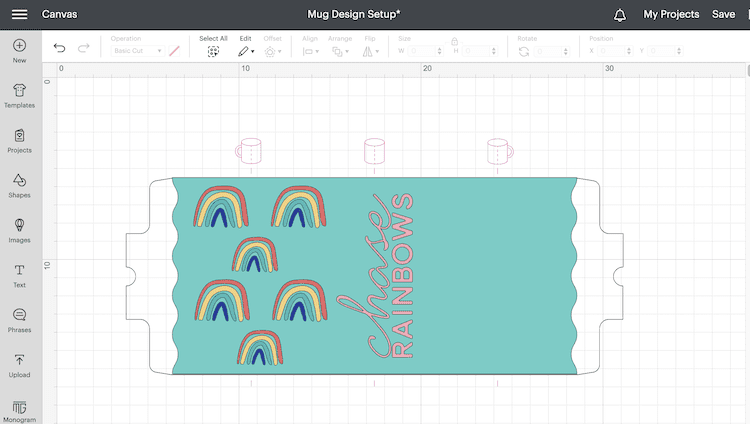
- Select the correct size of mug and edging that you would like to use. I'm using the “Large Wavy Mug Wrap: 15oz/425ml Mug Blank”.
- Once you have your mug size selected click “Customize”
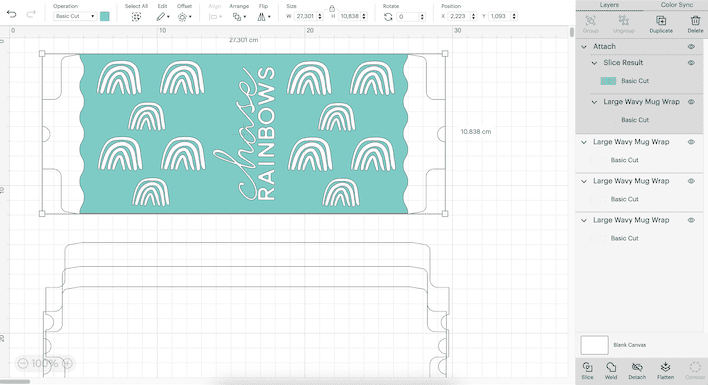
- The Mug Design Template will now be on our canvas. The blue represents the transfer sheet that will be wrapped and transferred around the mug.
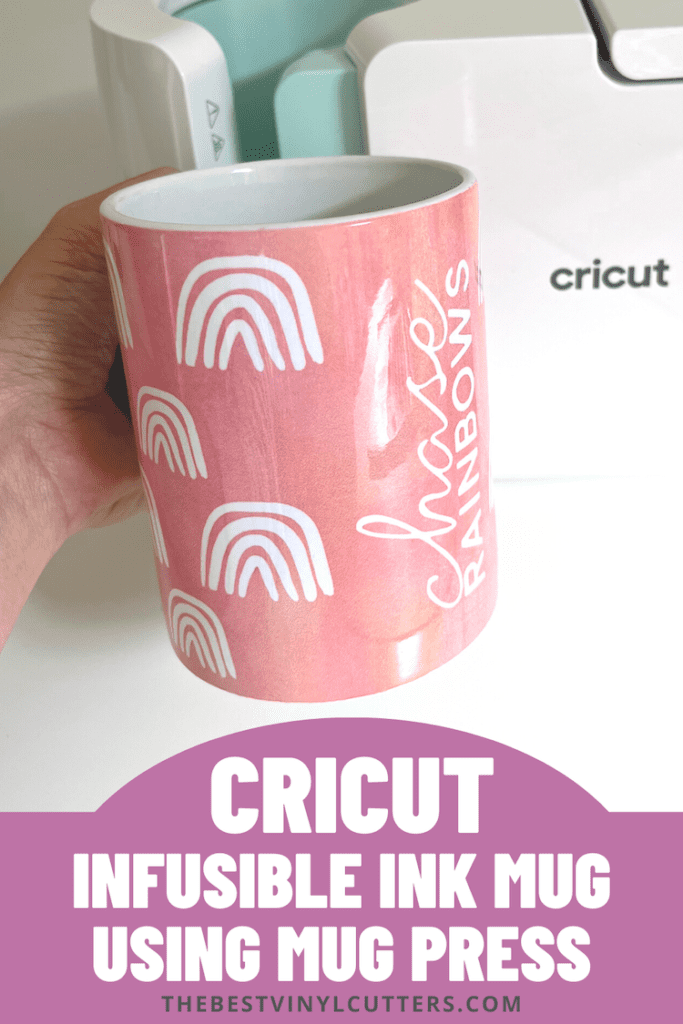
- To add your image click on “Image” and click on “Browse All Images”. We added two images. The first image is “Chase Rainbows” #M3C400BFA and the second image is a free image in Design Space called “Rainbow” #MF08B8AE.
TIP: You can search for a particular image by adding text in the search bar.
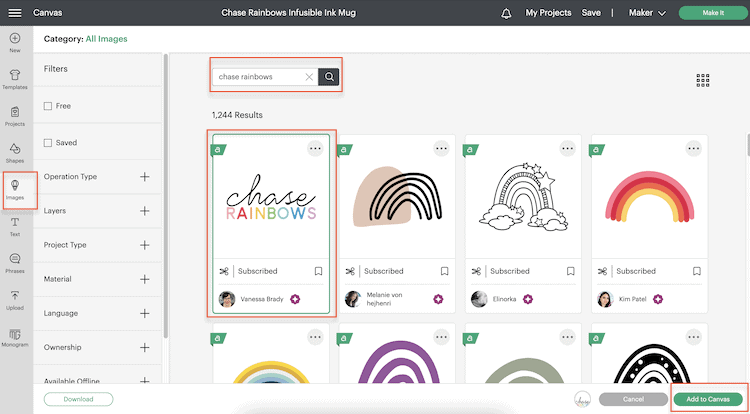
- Once you have got your chosen designs click on “Add To Canvas”
- Resize and position your images where you would like it using the red mugs and lines as a guide.
- Resize “Chase Rainbows” to 9cm wide. Rotate the image to 270.
- To center select the “Chase Rainbows” image and the Large Wavy Mug Wrap layer (Blue Layer), click on Align and then select “Center”.
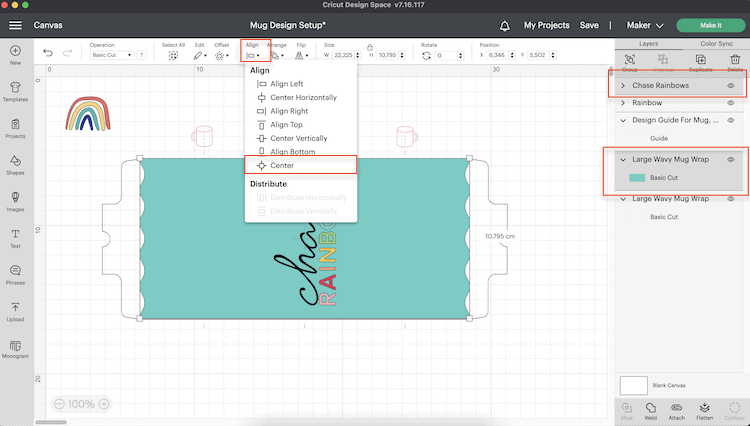
- Select the “Chase Rainbows” layer and click on Weld.
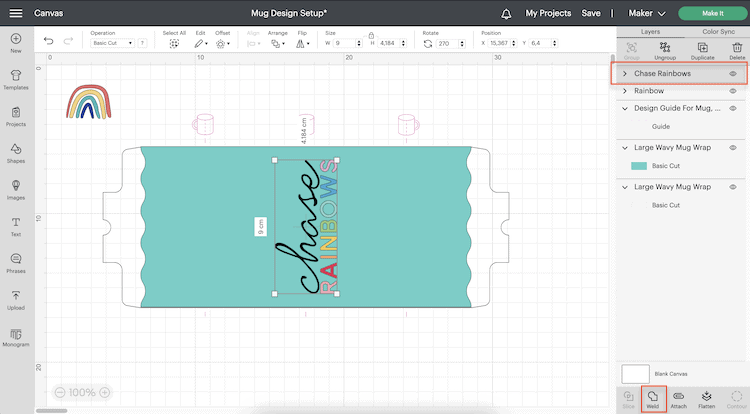
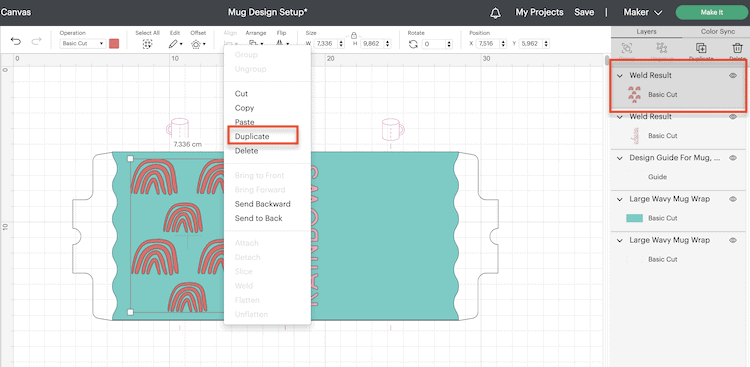
- Next resize the “Rainbow” image to 3cm wide. Duplicate and resize the duplicate to 2.5cm wide. Arrange the two sizes of rainbows as you wish. We continued to duplicate and arrange the rainbows on one side until we were happy with the layout.
- We are placing the same set of rainbows on the other side of the text image “Chase Rainbows”. Select all the rainbows and select “Weld”.
- Now right click on the welded image and select “Duplicate”, then move the duplicated image.
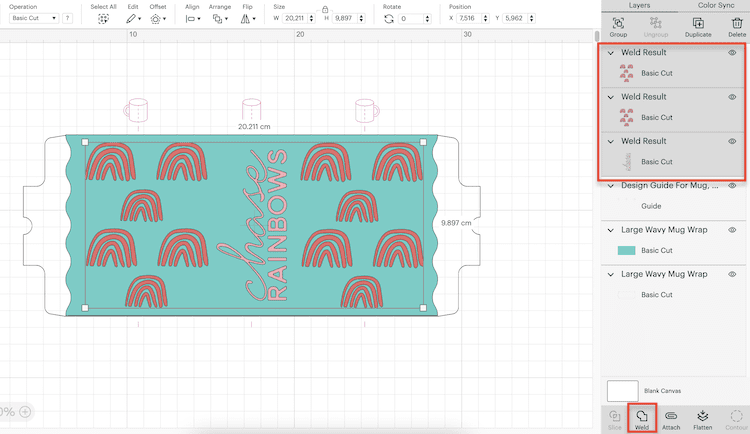
- Next, select all 3 welded layers and click on “Weld” they now become one layer.
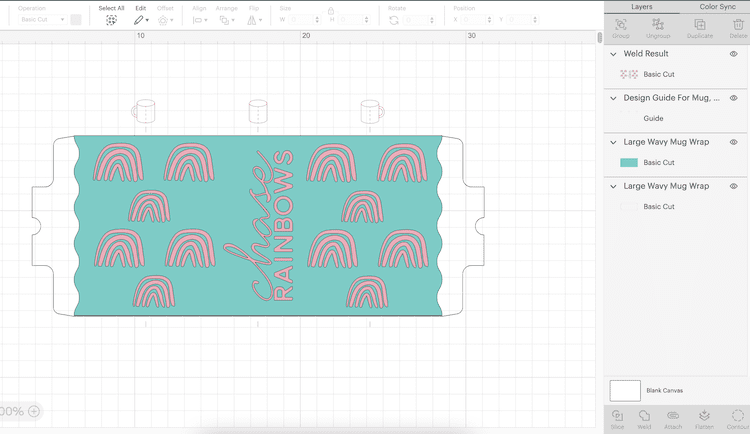
- Select your Weld layer and the Large Wavy Mug Wrap layer (Blue Layer) and click on ‘Slice”.
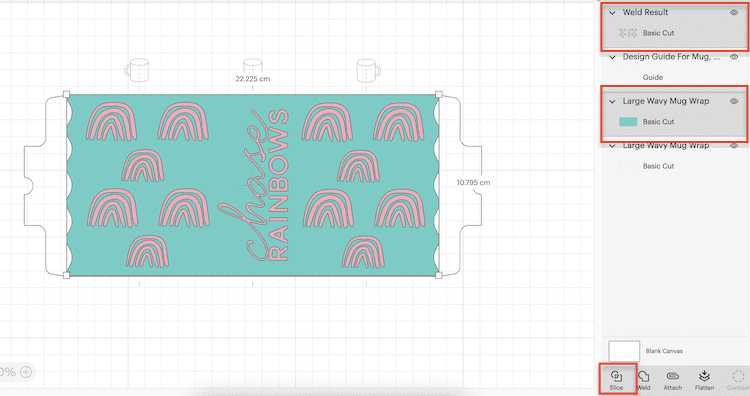
NOTE: Use the Slice function as you want the design to be cut out of the Infusible Ink Transfer Sheet. You can only slice two layers at a time so make sure you select the correct two layers.
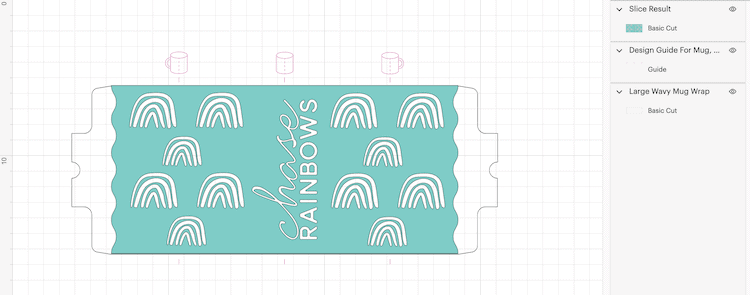
- Delete the sliced results that you do not need so that you are only left with the Large Wavy Mug Wrap Layer with the design cut out.
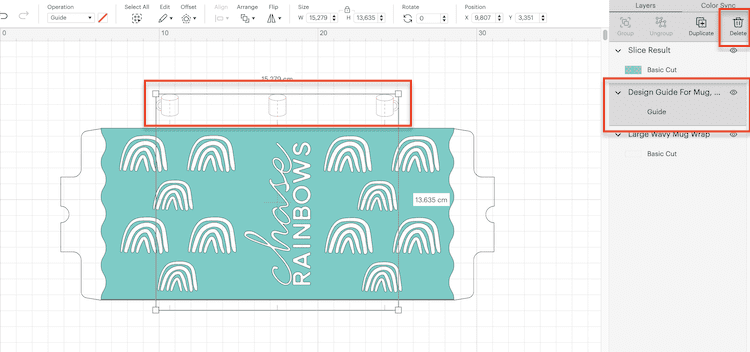
- To finish creating our design delete the red guidelines layer.
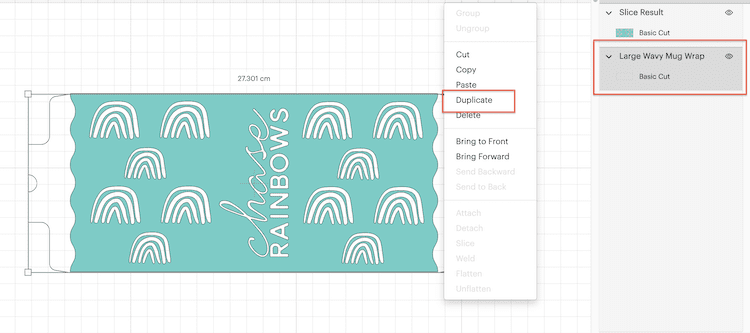
- Before we send the design to be drawn and cut, we need three extra blank mug templates cut. This is because the Infusible Ink may bleed through when pressing and would leave an imprint on the Mug Press unless we protect it. To do this select the mug template layer in your layers, right click on the template panel and select duplicate from the drop down menu. Repeat this two more times.
- All that is left to do now is to select the elements of our design, the images, and the mug template and, click “Attach”.
Step 2: Cut Your Infusible Ink Mug Design
Now we are ready to cut the design.
- Make sure to turn your Cricut Machine on.
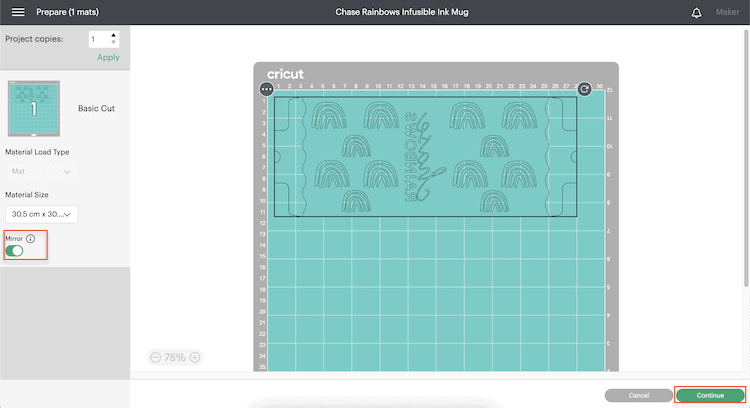
- Hide the duplicate layers of the mug template layer by clicking the eye icon for each of the extra three mug template layers.
- Select “Make It”.
- You will now see the project mat with the design on. Select “Mirror” for the design as it contains text. If you are not using any text you may not need to mirror your image.
- Select “Continue”
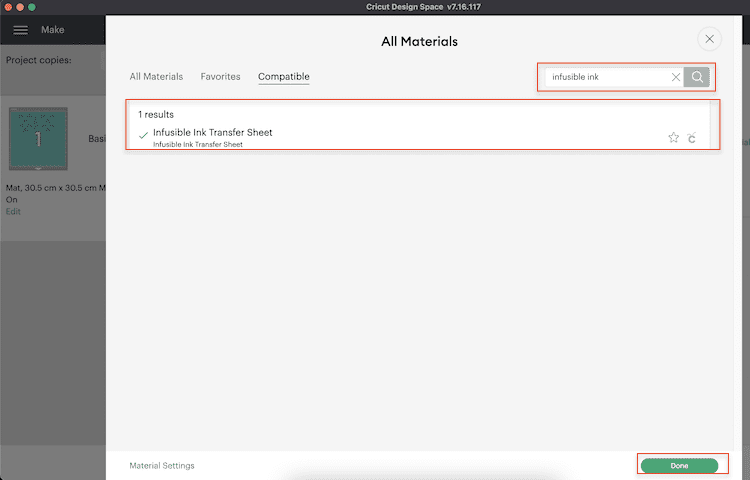
- Now change your Material Type to Infusible Ink by clicking on “Browse All Materials” and typing in Infusible Ink in the search bar.
- Select “Infusible Ink Transfer Sheet” and click on “Done”.
- Insert your Fine Point Blade in Clamp B.
- Place your Infusible Ink Transfer Sheet onto your Green StandardGrip Cutting Mat.
Before you handle your Infusible Ink Transfer Sheet make sure your hands are dry and clean. Wet or oily fingers can cause the ink to smudge.
- Load your mat into the Cricut machine and press “Go” on your machine.
- Your Cricut machine will now cut out your design.
TIP: Before unloading the mat, make sure your design has cut properly by trying to lift some of the design with your weeding pick. Be careful not to move the mat. If it has not cut all the way through, press the “Go” button again so that the machine will cut the design again.
- Return to your project canvas, hide the mug template with your design layer.
- Unhide the three plain mug templates.
- Repeat the steps to cut out the additional three plain mug press design templates.
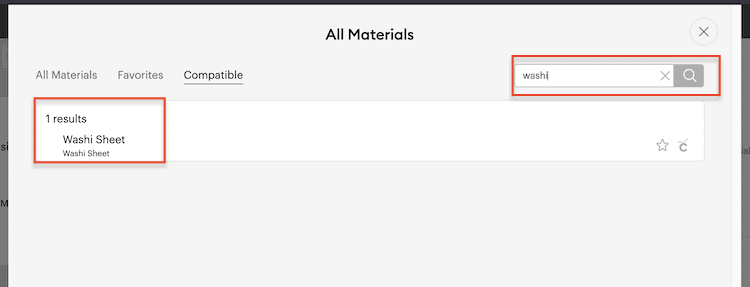
You will not find Butcher Paper in the materials list. Use the Washi Material setting as it will not tear the sheet when cutting.
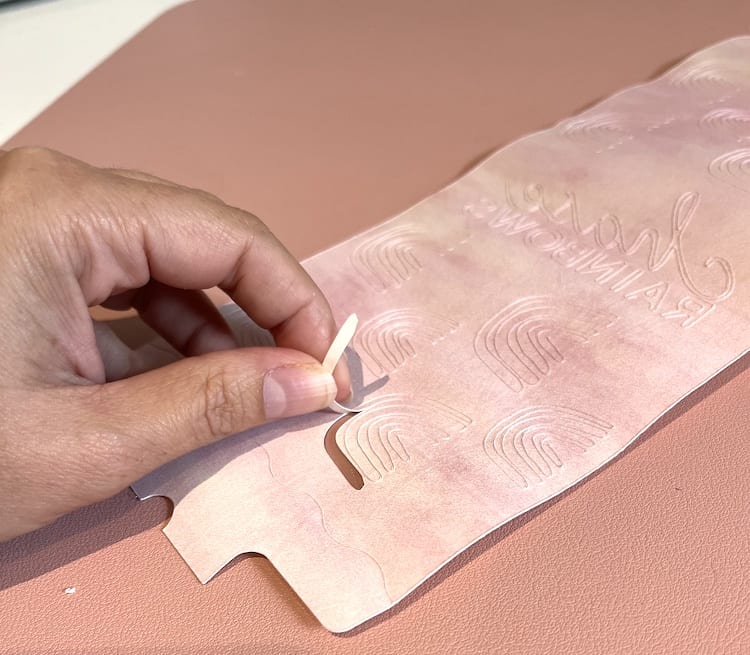
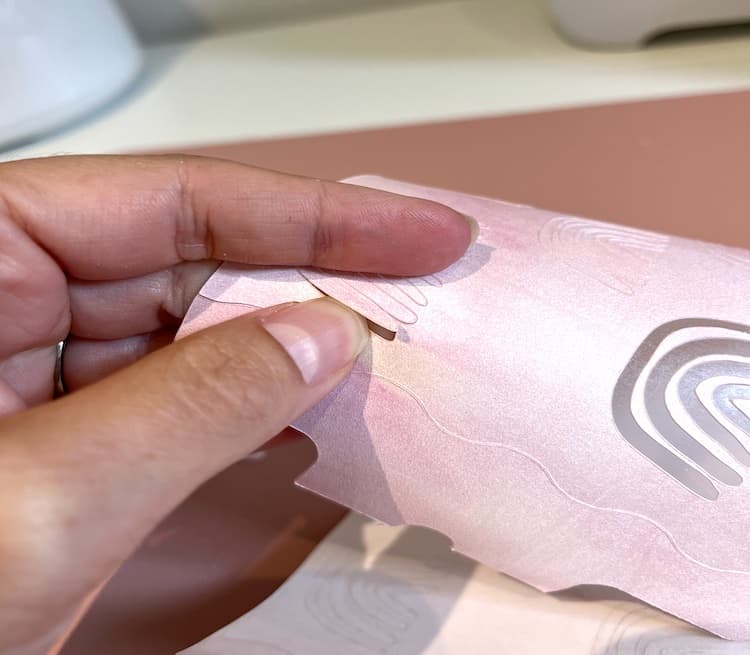
Step 3: Weed & Finish Your Design
- Remove the cut design from your cutting mat (I roll my mat away from the transfer sheet rather than trying to pull the sheet up and away from the mat).
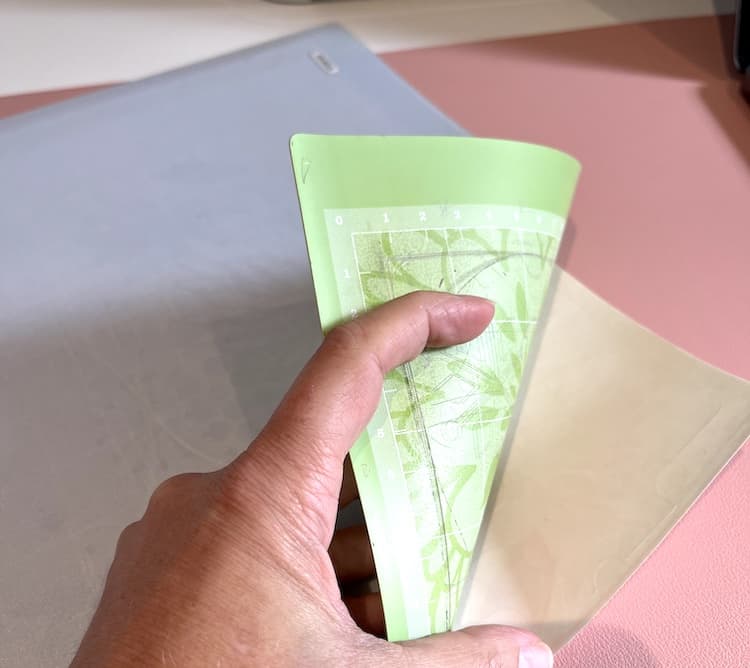
- Trim your Infusible Ink Transfer Sheet to remove the piece that has not been cut and store this rolled up and in the box.
- To weed out the parts that we do not need, roll the transfer sheets. This will help “crack” the cuts. However I find that if I send the design to cut twice, the cuts are clean and not much “cracking” is needed.
Step 4: Prepare the Mugs for Pressing
Now is a good time to switch on your Cricut MugPress so it can start heating up.
NOTE: Unlike Cricut EasyPress machines, the Cricut Mug Press temperature cannot be changed.
- Lift the lever and press the on button on the mug press. The button will be orange and the press will beep.
- Use a lint roller to remove any dust, fibres and fingerprints from the mug surface.
- Wrap your design around your clean mug with your ink facing the mug. Use the heat resistant tape to stick your design to the mug.
- I like to wrap my design tightly as this helps prevent ghosting or lighter transfer of ink to the mug when pressing.
- Tape one edge of the cut design to the mug and then wrap the design around and tape the other edge down. Now tape both the top and bottom of the design to the mug.
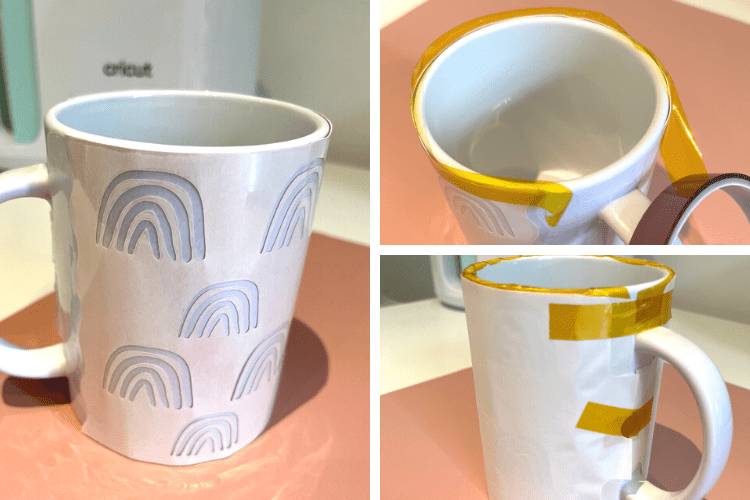
- Add the plain cut templates on top and secure in place with heat resistant tape.

Step 5: Apply the Infusible Ink to the Mug
- When the press is ready, the on button will turn green.
- Place your mug into your pre-heated Mug Press and close down the lever. Ensure that the press covers the sides of the design.
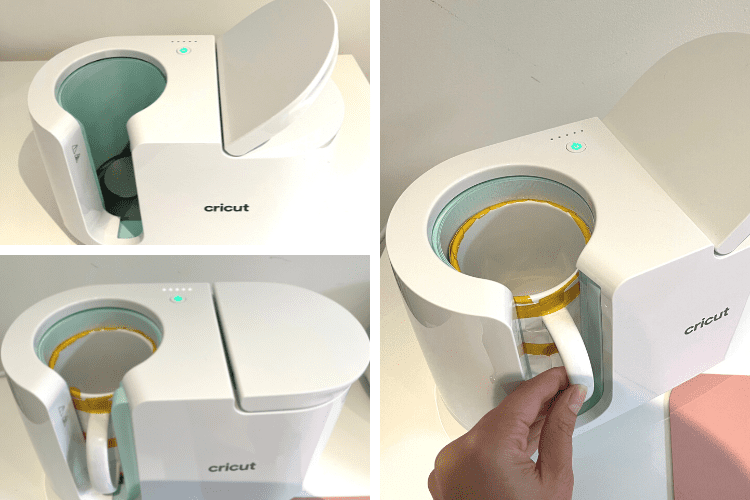
- When all the lights on the Mug Press flashing together and it beeps, lift the lever to release the mug from the press. Be careful as the mug may be hot.
- Slowly lift the mug out of the press.
- Switch off your press.
CAUTION: Mug will be very hot so let it cool completely before removing the laser paper from the mug. This will also prevent the design from ghosting or marbling.
- Once the mug is completely cooled, slowly remove the butcher paper from the mug by removing the heat-resistant tape.
- Next remove the Infusible Ink sheet.
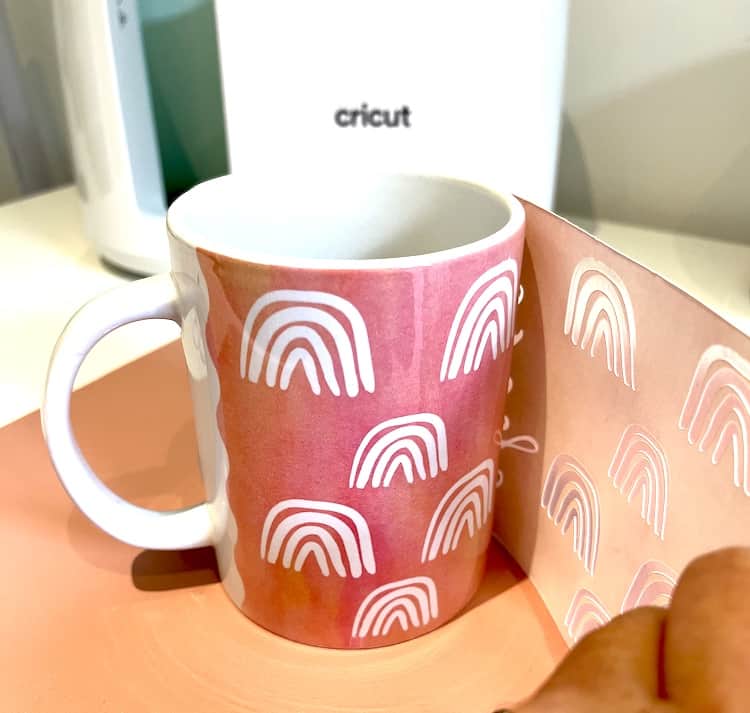
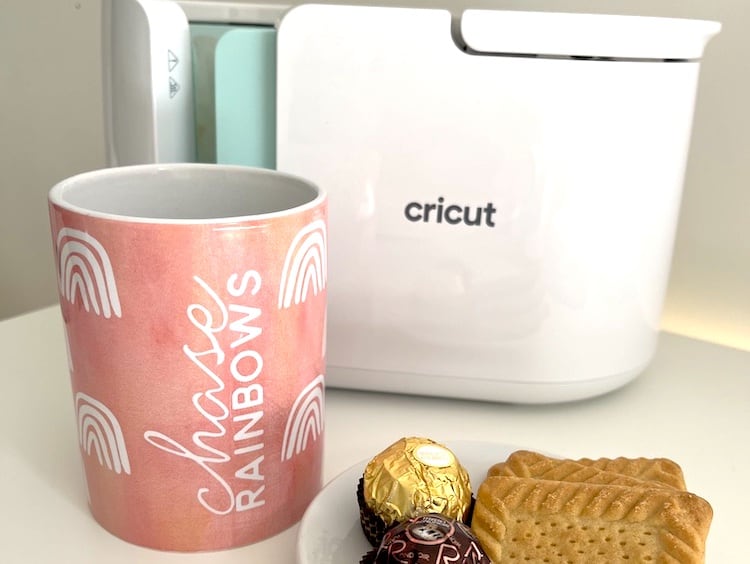
And just like that, you have your very own designed mug made with Cricut Infusible Ink pens and a Cricut Mug Press.
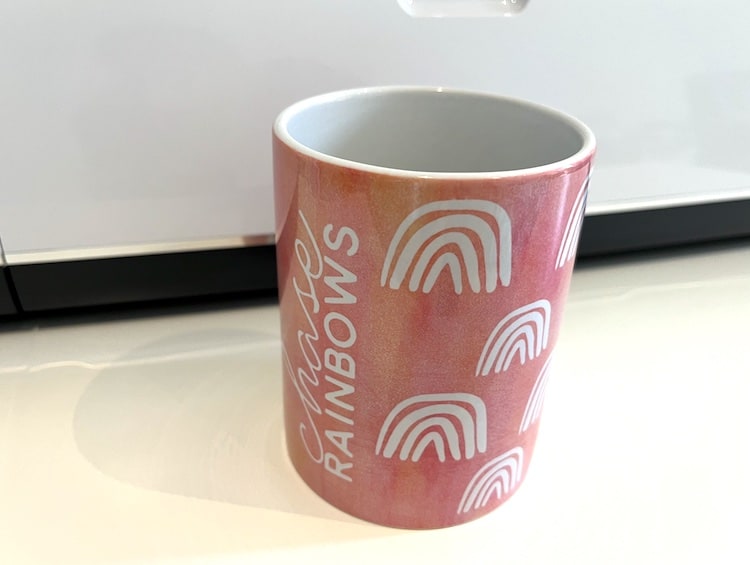
And you’re done! Now you have an awesome customized mug design that will someone very happy!
Now that you know how easy it is you can create Cricut Infusible Ink Mugs for gifts. If you have any EasyPress you can create matching Infusible Ink coasters using either your Cricut Infusible Ink Pens or Infusible Ink Transfer Sheets.
If you are loving the use of Cricut Infusible Ink why not create more great projects like this Infusible Ink multi-color t-shirt or an Infusible Ink puzzle.
Or you can even create this Father's Day Cricut Mug with Infusible Ink – perfect for dad!
If you want to learn more about what Infusible Ink shirts you can use, read our comprehensive guide all about t-shirt blanks for Infusible Ink.